Leitfaden für JavaScript
Mit unserem JavaScript SDK können Sie die Haptik in Ihr JS/TS-Projekt integrieren. Ein Typsystem für TypeScript sowie ESM werden ebenfalls unterstützt.
- Paket installieren
- Haptik-Umgebung einrichten
Voraussetzungen
- Node.js (die neueste LTS-Version wird empfohlen)
- OS: Windows 10/11 (x64), macOS (Apple Silicon)
- bHaptics Player installiert und ausgeführt
- Eine bereitgestellte haptische Anwendung, die zu Ihrem Projekt passt
- App ID und API Key der haptischen App
tact-js läuft nur im Browser. Verwenden Sie es innerhalb einer Web-App, die mit einem Tool wie Vite gebündelt wird.
About haptic application
You can create and manage haptic apps in Developer Portal, a web-based tool.
If you're unfamiliar with haptic apps or haven't created one yet, please follow the Portal guide before proceeding.
Before linking a haptic app to your game project, make sure the haptic app meets the following requirements:
- At least one haptic event must be created.
- API Key must be generated.
- There is no API Key by default. To generate one, go to the "API Key" tab and click "New" button.
- Haptic app must be deployed
- If you see "Deploy Now" button in the upper right corner, click it to deploy your haptic app. Otherwise, if you can see "Up to date", it means that the latest haptic app has already been deployed.
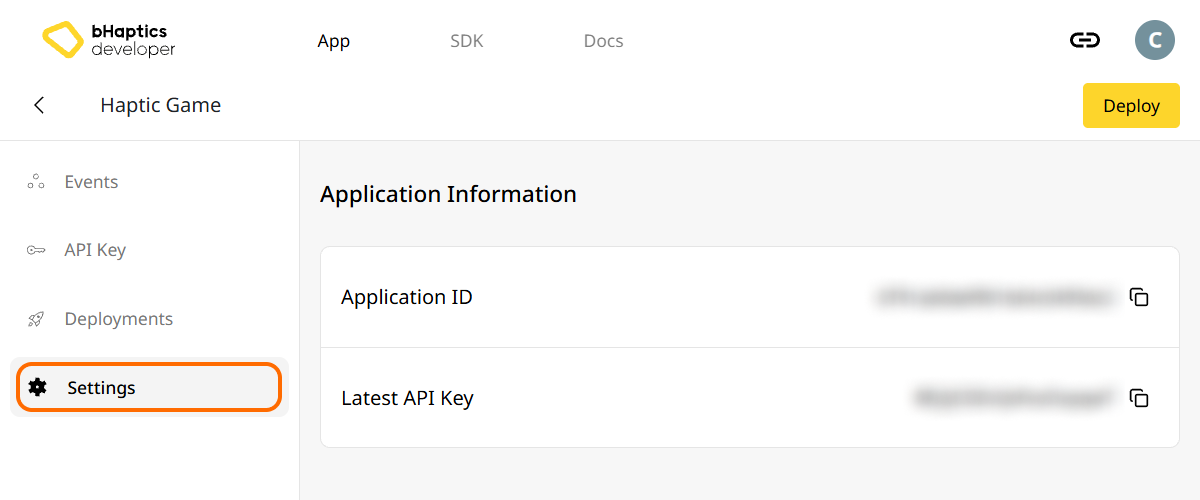
Also, link process requires App ID and API Key. Go to the "Settings" tab, and check the App ID and API Key.
Installation
- npm
- yarn
- pnpm
npm install tact-js
yarn add tact-js
pnpm add tact-js
Pakete importieren
import Tact from "tact-js";
Von der Optimierung ausschließen
Wenn Sie Vite verwenden, fügen Sie Folgendes zu Ihrer Vite-Konfigurationsdatei hinzu:
export default defineConfig({
  // ...
  optimizeDeps: {
    exclude: ['tact-js'],
  },
  // ...
});
Haptik-Umgebung einrichten
Bevor Sie haptikbezogene Funktionen verwenden, müssen Sie die haptische App mit Ihrem Projekt verknüpfen und die Haptik-Umgebung initialisieren.
Dazu benötigen Sie die App ID und den API Key Ihrer haptischen App. Diese erhalten Sie im bHaptics Developer Portal.
Initialisieren
- Ersetzen Sie
"your_app_id"und"your_api_key"durch Ihre App ID und Ihren API Key. - Stellen Sie sicher, dass die Anwendung bHaptics Player auf Ihrem Computer läuft, bevor Sie das JavaScript-Projekt starten.
import Tact from "tact-js";

const initTact = async () => {
  const result = await Tact.init({
    appId: "your_app_id",
    apiKey: "your_api_key",
  });

  console.log(result ? "Connection Success!" : "Connection Failed...");
}
Weiterführende Informationen
Sie sind nun bereit, die haptische Funktion von bHaptics zu verwenden! Besuchen Sie unsere JavaScript-Referenz, um Haptik in Ihrem Projekt abzuspielen, oder sehen Sie sich den vollständigen Beispielcode unten an.
Falls Sie Probleme bei der Verwendung dieser Bibliothek haben, lesen Sie die Fehlerbehebung.
Vollständiger Beispielcode
Das folgende Beispiel verwendet Vite, da tact-js im Browser läuft. Stellen Sie sicher, dass der bHaptics Player läuft, bevor Sie die Seite öffnen.
<!doctype html>
<html lang="en">
  <head>
    <meta charset="UTF-8" />
    <title>bHaptics tact-js example</title>
  </head>
  <body>
    <button id="play">Play haptic</button>
    <pre id="log"></pre>
    <script type="module" src="/src/main.js"></script>
  </body>
</html>
import Tact, { PositionType } from "tact-js";

// Replace with your App ID and API Key from the bHaptics Developer Portal.
const APP_ID = "your_app_id";
const API_KEY = "your_api_key";

const logEl = document.getElementById("log");
const log = (msg) => {
  console.log(msg);
  logEl.textContent += msg + "\n";
};

const sleep = (ms) => new Promise((resolve) => setTimeout(resolve, ms));

let ready = false;

// 1. Initialize on load. bHaptics Player must already be running.
const initialize = async () => {
  log("Initializing bHaptics SDK...");
  ready = await Tact.init({ appId: APP_ID, apiKey: API_KEY });
  log(ready ? "Connected to bHaptics Player." : "Failed to connect. Is bHaptics Player running?");

  if (ready) {
    const devices = await Tact.getConnectedDevices();
    log(`Connected devices: ${JSON.stringify(devices)}`);
  }
};

// 2. Run a short haptic sequence when the button is clicked.
const runDemo = async () => {
  if (!ready) {
    log("SDK is not ready yet.");
    return;
  }

  // Play dot pattern — first 16 of the TactSuit Pro's 32 motors.
  log("- Playing dot pattern");
  const motorValues = [...Array(16).fill(50), ...Array(16).fill(0)];
  await Tact.playDot({ position: PositionType.Vest, motorValues, duration: 2000 });
  await sleep(2500);

  // Play path pattern.
  log("- Playing path pattern");
  await Tact.playPath({
    position: PositionType.Vest,
    x: [0.2, 0.4, 0.6, 0.8],
    y: [0.2, 0.8, 0.2, 0.8],
    intensity: [80, 60, 80, 60],
    duration: 3000,
  });
  await sleep(3500);

  // Play glove waveform on both hands (if connected).
  log("- Testing glove haptics");
  const motors = new Int32Array([100, 0, 0, 0, 0, 100, 0, 100]);
  const playtimes = new Int32Array([8, 0, 0, 0, 0, 1, 0, 4]);
  const shapes = new Int32Array([2, 0, 0, 0, 0, 0, 0, 0]);
  await Tact.playGlove({ position: PositionType.GloveL, motors, playtimes, shapes, repeatCount: 1 });
  await sleep(1000);
  await Tact.playGlove({ position: PositionType.GloveR, motors, playtimes, shapes, repeatCount: 1 });
  await sleep(1000);

  await Tact.stopAll();
  log("Demo completed");
};

document.getElementById("play").addEventListener("click", runDemo);

initialize();
Wenn Sie weitere Beispiele erkunden möchten, sehen Sie sich die README unseres offiziellen GitHub-Repositorys an.