Leitfaden für Python
Mit unserem Python SDK können Sie Haptik in Ihr Python-Projekt integrieren.
- Paket installieren
- Haptik-Umgebung einrichten
Voraussetzungen
- OS: Windows 10/11 (x64), macOS (Apple Silicon)
- Python 3.8 - 3.12
- bHaptics Player installiert und gestartet
- Eine bereitgestellte haptische Anwendung, die zu Ihrem Projekt passt
- App ID und API Key der haptischen App
About haptic application
You can create and manage haptic apps in Developer Portal, a web-based tool.
If you're unfamiliar with haptic apps or haven't created one yet, please follow the Portal guide before proceeding.
Before linking a haptic app to your game project, make sure the haptic app meets the following requirements:
- At least one haptic event must be created.
- API Key must be generated.
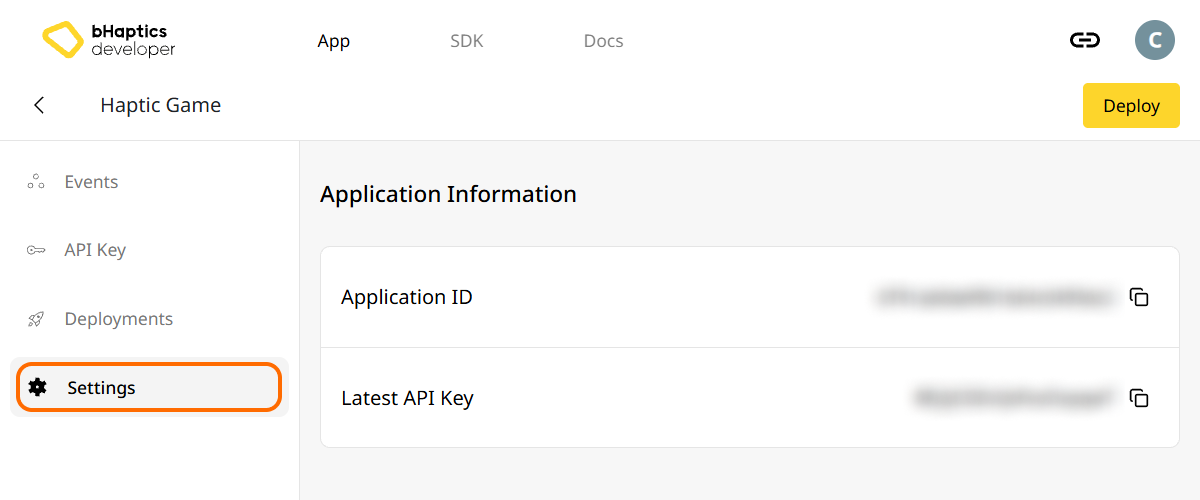
- There is no API Key by default. To generate one, go to the "API Key" tab and click "New" button.
- Haptic app must be deployed
- If you see "Deploy Now" button in the upper right corner, click it to deploy your haptic app. Otherwise, if you can see "Up to date", it means that the latest haptic app has already been deployed.
Also, link process requires App ID and API Key. Go to the "Settings" tab, and check the App ID and API Key.
Installation
Installieren Sie das bHaptics Python SDK über pip von PyPI:
pip install bhaptics-python
Pakete importieren
# bHaptics SDK
import bhaptics_python

# Coroutine
import asyncio
Sie sollten außerdem das Paket asyncio importieren, da die meisten Funktionen Coroutinen sind.
Haptik-Umgebung einrichten
Bevor Sie haptikbezogene Funktionen verwenden, müssen Sie die haptische App mit Ihrem Projekt verknüpfen und die Haptik-Umgebung initialisieren.
Dazu benötigen Sie die App ID und den API Key Ihrer haptischen App. Diese erhalten Sie im bHaptics Developer Portal.
Initialisieren
- Ersetzen Sie
"your_app_id"und"your_api_key"durch Ihre App ID und Ihren API Key. - Stellen Sie sicher, dass die bHaptics Player-Anwendung auf Ihrem Computer läuft, bevor Sie das Python-Skript starten.
import bhaptics_python
import asyncio

async def main():
    app_id = "your_app_id"        # Replace with your App ID
    api_key = "your_api_key"      # Replace with your API key

    # Initialize SDK
    result = await bhaptics_python.registry_and_initialize(app_id, api_key, "")
    print(f"Initialization result: {result}")

    # Example: Play a haptic event
    event_name = "your_event_name"
    request_id = await bhaptics_python.play_event(event_name)
    print(f"Playing event: {event_name}, Request ID: {request_id}")

asyncio.run(main())
Über den Device Index
Das bHaptics SDK unterstützt die gleichzeitige Steuerung mehrerer Geräte. Mit dem Device-Index-System können Sie alle Geräte oder bestimmte Geräte ansteuern.
Jedes haptische Gerät hat seinen eigenen Device Index. Standardmäßig ist der Device Index auf -1 gesetzt. Sie können den Device Index über den bHaptics Player ändern.
- Alle Geräte: Funktionen ohne den Parameter
device_indexwirken sich auf alle nicht geänderten Geräte aus (Device Index ist-1). - Bestimmtes Gerät: Funktionen mit dem Parameter
device_indexzielen auf ein bestimmtes Gerät ab.
# Affect all unmodified devices.
await bhaptics_python.play_event(event_name)

# Affect only devices that device index is 0.
await bhaptics_python.play_event(event_name, 0)
Sie können die Device-Indizes im bHaptics Player durchsuchen oder festlegen.
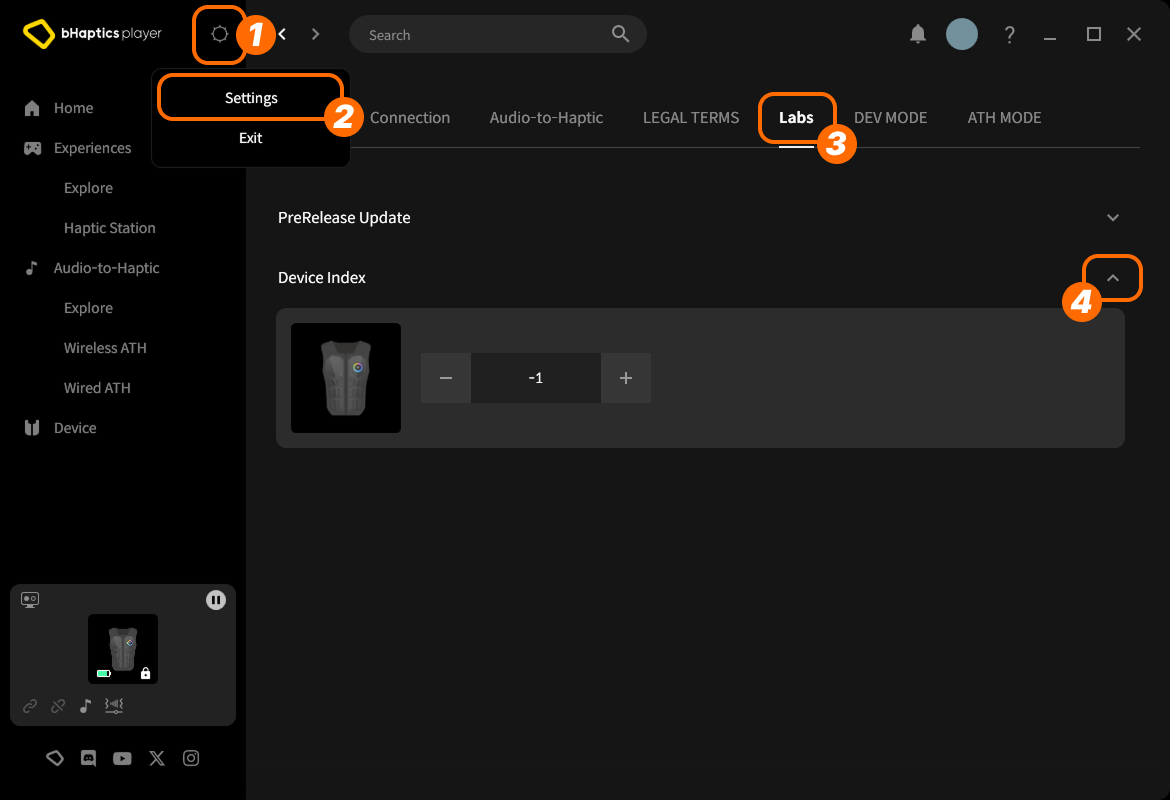
- Klicken Sie oben rechts auf das setting icon (Einstellungssymbol).
- Klicken Sie auf "Settings".
- Wechseln Sie zum Tab "Labs".
- Klappen Sie "Device Index" auf.
Suchen Sie dann das Gerät in der Liste und passen Sie den Index an, indem Sie auf "+" oder "-" klicken.
Über den Device Type
Verschiedene Gerätetypen haben unterschiedliche Bereiche. Verwenden Sie dies, wenn Sie Haptik für einen bestimmten Körperteil benötigen.
| Wert | Gerät | Platziert an... | Anzahl Motoren |
|---|---|---|---|
0 | TactSuit Pro | Oberkörper | 32 |
1 | TactSleeve(Left) | Linkes Handgelenk | 3 |
2 | TactSleeve(Right) | Rechtes Handgelenk | 3 |
3 | TactVisor | Kopf | 4 |
4 | Tactosy for Hands(Left) | Linke Hand | 3 |
5 | Tactosy for Hands(Right) | Rechte Hand | 3 |
6 | Tactosy for Feet(Left) | Linker Fuß | 3 |
7 | Tactosy for Feet(Right) | Rechter Fuß | 3 |
8 | TactGlove(Left) | Linke Hand | 8 |
9 | TactGlove(Right) | Rechte Hand | 8 |
Der Device-Type-Wert wird von der Haptik-Funktion verwendet, die kein Event nutzt, sondern die Vibrationsstärke der Motoren direkt angibt.
device_type = 0    # TactSuit Pro
motors_count = 32  # TactSuit Pro has 32 motors

strength = 50      # 50% strength
duration = 400     # 400 milliseconds

await bhaptics_python.play_dot(device_type, duration, [strength] * motors_count)
Weiterführende Lektüre
Sie sind nun bereit, die haptische Funktion von bHaptics zu nutzen! Besuchen Sie unsere Python-Referenz, um Haptik in Ihrem Projekt abzuspielen, oder sehen Sie sich den vollständigen Beispielcode unten an.
Wenn Sie Probleme bei der Verwendung dieser Bibliothek haben, lesen Sie die Fehlerbehebung.
Vollständiger Beispielcode
import bhaptics_python
import asyncio
import time

async def haptic_demo():
    # 1. Initialization
    app_id = "your_app_id"
    api_key = "your_api_key"

    print("🔧 Initializing bHaptics SDK...")
    result = await bhaptics_python.registry_and_initialize(app_id, api_key, "")
    print(f"Initialization result: {result}")

    print("✅ Connected to bHaptics Player.")

    # 2. Check device information
    device_info = await bhaptics_python.get_device_info_json()
    print(f"📱 Connected device info: {device_info}")

    # 3. Test haptic effects
    print("\n🎮 Starting haptic effect tests...")

    # Play dot pattern
    print("• Playing dot pattern")
    values = [50] * 16 + [0] * 16  # Activate first 16 of 32 motors
    await bhaptics_python.play_dot(0, 2000, values)
    await asyncio.sleep(2.5)

    # Play path pattern
    print("• Playing path pattern")
    x = [0.2, 0.4, 0.6, 0.8]
    y = [0.2, 0.8, 0.2, 0.8]
    intensity = [80, 60, 80, 60]
    await bhaptics_python.play_path(0, 3000, x, y, intensity)
    await asyncio.sleep(3.5)

    # Test glove haptics (if available)
    print("• Testing glove haptics")
    glove_motors = [100] * 8
    glove_playtimes = [500] * 8
    glove_shapes = [2] * 8

    # Left hand
    await bhaptics_python.play_glove(8, glove_motors, glove_playtimes, glove_shapes, 0)
    await asyncio.sleep(1)

    # Right hand
    await bhaptics_python.play_glove(9, glove_motors, glove_playtimes, glove_shapes, 0)
    await asyncio.sleep(1)

    # 4. Cleanup
    await bhaptics_python.stop_all()
    await bhaptics_python.close()
    print("🔚 Demo completed")

# Run the demo
if __name__ == "__main__":
    asyncio.run(haptic_demo())
Wenn Sie weitere Beispiele erkunden möchten, sehen Sie sich die README unseres offiziellen GitHub-Repositorys an.
Fehlerbehandlung
Umschließen Sie SDK-Aufrufe in Produktionsanwendungen immer mit try-catch-Blöcken:
try:
    result = await bhaptics_python.registry_and_initialize(app_id, api_key, "")
    if not result:
        print("Failed to initialize bHaptics SDK")
except Exception as e:
    print(f"Error initializing SDK: {e}")