Guía para JavaScript
Con nuestro SDK de JavaScript, puede implementar la retroalimentación háptica en su proyecto JS/TS. También se admiten el sistema de tipos para TypeScript y ESM.
- Instalar el paquete
- Configurar el entorno háptico
Requisitos
- Node.js (se recomienda la última versión LTS)
- SO: Windows 10/11 (x64), macOS (Apple Silicon)
- bHaptics Player instalado y en ejecución
- Una aplicación háptica desplegada que corresponda a su proyecto
- App ID y API Key de la aplicación háptica
tact-js se ejecuta únicamente en el navegador. Úselo dentro de una aplicación web empaquetada con una herramienta como Vite.
About haptic application
You can create and manage haptic apps in Developer Portal, a web-based tool.
If you're unfamiliar with haptic apps or haven't created one yet, please follow the Portal guide before proceeding.
Before linking a haptic app to your game project, make sure the haptic app meets the following requirements:
- At least one haptic event must be created.
- API Key must be generated.
- There is no API Key by default. To generate one, go to the "API Key" tab and click "New" button.
- Haptic app must be deployed
- If you see "Deploy Now" button in the upper right corner, click it to deploy your haptic app. Otherwise, if you can see "Up to date", it means that the latest haptic app has already been deployed.
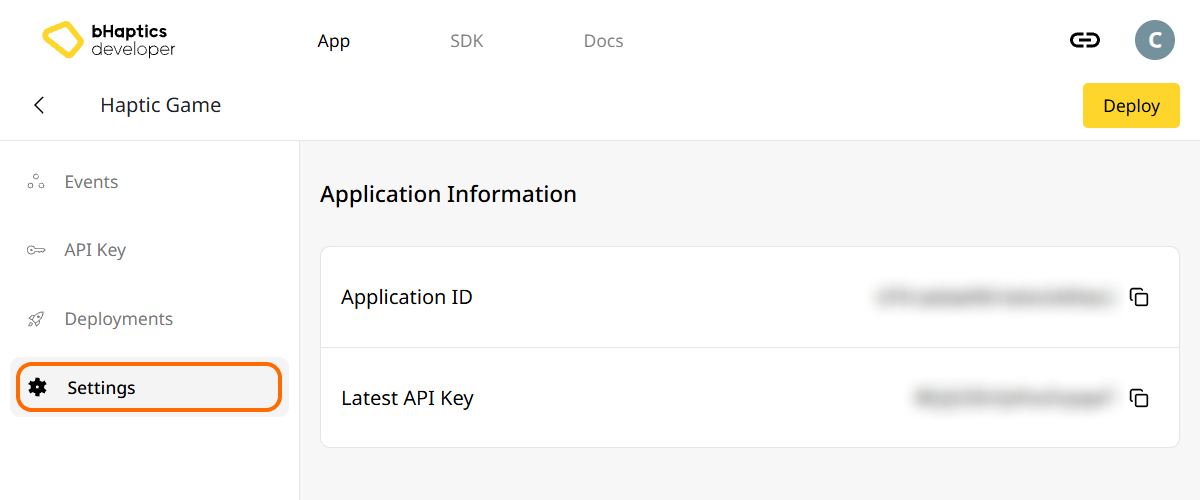
Also, link process requires App ID and API Key. Go to the "Settings" tab, and check the App ID and API Key.
Instalación
- npm
- yarn
- pnpm
npm install tact-js
yarn add tact-js
pnpm add tact-js
Importar paquetes
import Tact from "tact-js";
Excluir para optimizar
Si está usando Vite, añada lo siguiente a su archivo de configuración de Vite:
export default defineConfig({
  // ...
  optimizeDeps: {
    exclude: ['tact-js'],
  },
  // ...
});
Configurar el entorno háptico
Antes de usar cualquier función relacionada con la háptica, debe vincular la aplicación háptica a su proyecto e inicializar el entorno háptico.
Para ello, necesita el App ID y la API Key de su aplicación háptica. Puede obtenerlos en el bHaptics Developer Portal.
Inicializar
- Reemplace
"your_app_id"y"your_api_key"por su App ID y su API Key. - Antes de ejecutar el proyecto de JavaScript, asegúrese de que la aplicación bHaptics Player esté en ejecución en su equipo.
import Tact from "tact-js";

const initTact = async () => {
  const result = await Tact.init({
    appId: "your_app_id",
    apiKey: "your_api_key",
  });

  console.log(result ? "Connection Success!" : "Connection Failed...");
}
Lecturas adicionales
¡Ahora está listo para usar la función háptica de bHaptics! Visite nuestra Referencia de JavaScript para reproducir háptica en su proyecto, o consulte el código de ejemplo completo a continuación.
Si tiene problemas al usar esta librería, consulte la Solución de problemas.
Código de ejemplo completo
El ejemplo a continuación usa Vite, ya que tact-js se ejecuta en el navegador. Asegúrese de que bHaptics Player esté en ejecución antes de abrir la página.
<!doctype html>
<html lang="en">
  <head>
    <meta charset="UTF-8" />
    <title>bHaptics tact-js example</title>
  </head>
  <body>
    <button id="play">Play haptic</button>
    <pre id="log"></pre>
    <script type="module" src="/src/main.js"></script>
  </body>
</html>
import Tact, { PositionType } from "tact-js";

// Replace with your App ID and API Key from the bHaptics Developer Portal.
const APP_ID = "your_app_id";
const API_KEY = "your_api_key";

const logEl = document.getElementById("log");
const log = (msg) => {
  console.log(msg);
  logEl.textContent += msg + "\n";
};

const sleep = (ms) => new Promise((resolve) => setTimeout(resolve, ms));

let ready = false;

// 1. Initialize on load. bHaptics Player must already be running.
const initialize = async () => {
  log("Initializing bHaptics SDK...");
  ready = await Tact.init({ appId: APP_ID, apiKey: API_KEY });
  log(ready ? "Connected to bHaptics Player." : "Failed to connect. Is bHaptics Player running?");

  if (ready) {
    const devices = await Tact.getConnectedDevices();
    log(`Connected devices: ${JSON.stringify(devices)}`);
  }
};

// 2. Run a short haptic sequence when the button is clicked.
const runDemo = async () => {
  if (!ready) {
    log("SDK is not ready yet.");
    return;
  }

  // Play dot pattern — first 16 of the TactSuit Pro's 32 motors.
  log("- Playing dot pattern");
  const motorValues = [...Array(16).fill(50), ...Array(16).fill(0)];
  await Tact.playDot({ position: PositionType.Vest, motorValues, duration: 2000 });
  await sleep(2500);

  // Play path pattern.
  log("- Playing path pattern");
  await Tact.playPath({
    position: PositionType.Vest,
    x: [0.2, 0.4, 0.6, 0.8],
    y: [0.2, 0.8, 0.2, 0.8],
    intensity: [80, 60, 80, 60],
    duration: 3000,
  });
  await sleep(3500);

  // Play glove waveform on both hands (if connected).
  log("- Testing glove haptics");
  const motors = new Int32Array([100, 0, 0, 0, 0, 100, 0, 100]);
  const playtimes = new Int32Array([8, 0, 0, 0, 0, 1, 0, 4]);
  const shapes = new Int32Array([2, 0, 0, 0, 0, 0, 0, 0]);
  await Tact.playGlove({ position: PositionType.GloveL, motors, playtimes, shapes, repeatCount: 1 });
  await sleep(1000);
  await Tact.playGlove({ position: PositionType.GloveR, motors, playtimes, shapes, repeatCount: 1 });
  await sleep(1000);

  await Tact.stopAll();
  log("Demo completed");
};

document.getElementById("play").addEventListener("click", runDemo);

initialize();
Si desea explorar más ejemplos, consulte el README de nuestro repositorio oficial de GitHub.