Guía para Swift
Con nuestro SDK de Swift, puede implementar el háptico en sus aplicaciones de iOS, visionOS y macOS.
- Instalar el paquete
- Configurar el entorno háptico
- Conectar dispositivos
Requisitos
- Xcode 16 o posterior
- SO: iOS 13.0+, visionOS 2.0+, macOS 10.15+
- Conexión a Internet, para descargar los eventos hápticos durante la inicialización
- Solo macOS: bHaptics Player instalado y en ejecución
- Aplicación háptica desplegada correspondiente a su proyecto
- App ID y API Key de la aplicación háptica
- iOS / visionOS: el SDK se conecta directamente a los dispositivos hápticos mediante Bluetooth LE. No se requiere ninguna aplicación complementaria.
- macOS: el SDK se conecta a bHaptics Player, y bHaptics Player gestiona los dispositivos hápticos. Empareje sus dispositivos en bHaptics Player.
Se usa la misma API en todas las plataformas.
About haptic application
You can create and manage haptic apps in Developer Portal, a web-based tool.
If you're unfamiliar with haptic apps or haven't created one yet, please follow the Portal guide before proceeding.
Before linking a haptic app to your game project, make sure the haptic app meets the following requirements:
- At least one haptic event must be created.
- API Key must be generated.
- There is no API Key by default. To generate one, go to the "API Key" tab and click "New" button.
- Haptic app must be deployed
- If you see "Deploy Now" button in the upper right corner, click it to deploy your haptic app. Otherwise, if you can see "Up to date", it means that the latest haptic app has already been deployed.
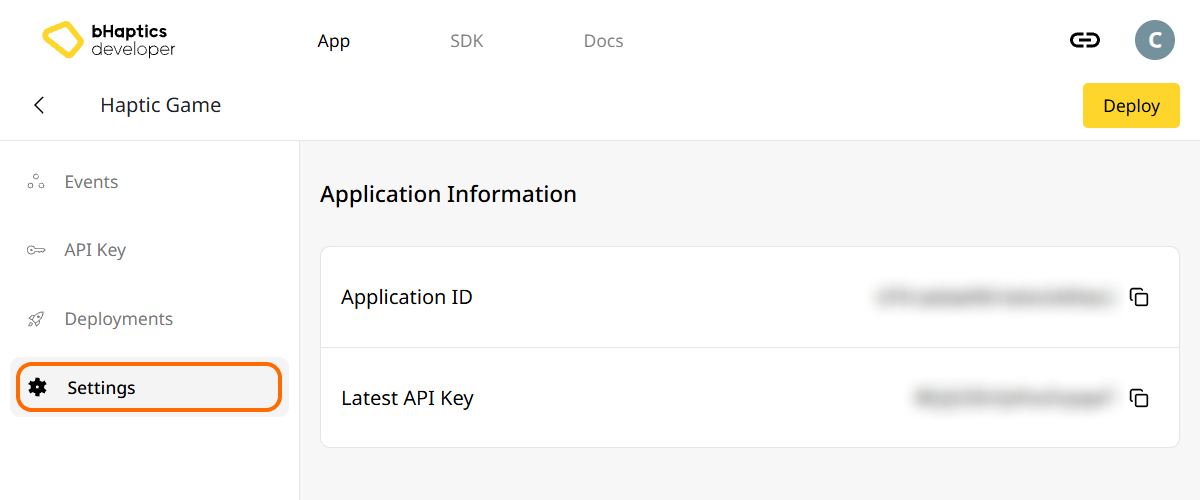
Also, link process requires App ID and API Key. Go to the "Settings" tab, and check the App ID and API Key.
Instalación
Instale el SDK de Swift de bHaptics con Swift Package Manager.
- En Xcode, seleccione File > Add Package Dependencies....
- Introduzca la URL del paquete:
https://github.com/bhaptics/bhaptics-ios - Establezca Dependency Rule en Up to Next Major Version a partir de
1.0.1. - Añada la biblioteca
Bhapticsal target de su aplicación.
Si gestiona las dependencias en Package.swift, añada el paquete como se indica a continuación:
dependencies: [
    .package(url: "https://github.com/bhaptics/bhaptics-ios", .upToNextMajor(from: "1.0.1"))
],
targets: [
    .target(
        name: "YourApp",
        dependencies: [.product(name: "Bhaptics", package: "bhaptics-ios")]
    )
]
Importar paquetes
import BhapticsPlugin
Permiso de Bluetooth
iOS / visionOS: añada NSBluetoothAlwaysUsageDescription (Privacy - Bluetooth Always Usage Description) a los ajustes Info del target de su aplicación, con un mensaje que explique por qué su aplicación usa Bluetooth. La solicitud de permiso aparece cuando crea BhapticsKit. Sin esta clave, la aplicación se bloquea cuando el SDK accede a Bluetooth.
macOS: si App Sandbox está habilitado, vaya a Signing & Capabilities > App Sandbox y marque Outgoing Connections (Client) para que el SDK pueda conectarse a bHaptics Player.
Configurar el entorno háptico
Antes de usar cualquier función relacionada con hápticos, debe vincular la aplicación háptica a su proyecto e inicializar el entorno háptico.
Para ello, necesita el App ID y la API Key de su aplicación háptica. Puede obtenerlos en el bHaptics Developer Portal.
Inicializar
- Reemplace
"your_app_id"y"your_api_key"por su App ID y su API Key. - Cree una sola instancia de
BhapticsKity consérvela durante todo el ciclo de vida de su aplicación.
import BhapticsPlugin

let kit = BhapticsKit()

Task {
    let result = await kit.initialize(appId: "your_app_id", apiKey: "your_api_key", defaultSetting: "")
    print("Initialization result: \(result)")

    // Example: Play a haptic event
    let requestId = kit.play(eventId: "your_event_name")
    print("Request ID: \(requestId)")
}
En iOS y visionOS, initialize descarga desde el servidor los eventos hápticos de su aplicación háptica. En macOS, se conecta a bHaptics Player; inicie bHaptics Player antes de llamar a initialize.
Conectar dispositivos
Este paso es solo para iOS y visionOS. En macOS, empareje los dispositivos en bHaptics Player.
El SDK encuentra los dispositivos bHaptics cercanos mediante Bluetooth LE. Una vez que empareja un dispositivo, el SDK lo recuerda y lo vuelve a conectar automáticamente cuando lo encuentra en un escaneo posterior.
- Espere hasta que Bluetooth esté listo y luego llame a
scan(). - Muestre al usuario los dispositivos encontrados y llame a
pair(device:)en el que el usuario seleccione. - Llame a
stopScan()cuando termine.
Implemente BhapticsKitDelegate para recibir notificaciones cuando Bluetooth esté listo y cuando cambie la lista de dispositivos.
import BhapticsPlugin

final class HapticManager: BhapticsKitDelegate {
    private var kit: BhapticsKit!
    private(set) var devices: [BhapticsDevice] = []

    init() {
        kit = BhapticsKit(delegate: self)
    }

    func pair(_ device: BhapticsDevice) {
        kit.pair(device: device)
    }

    // Bluetooth is ready. Start scanning.
    func bHapticsKit(_ kit: BhapticsKit, bleStateChange state: Bool) {
        if state {
            kit.scan()
        }
    }

    // Found, paired, connected, or disconnected devices.
    func bHapticsKit(_ kit: BhapticsKit, deviceStateUpdated devices: [BhapticsDevice]) {
        self.devices = devices
    }

    func bHapticsKit(_ kit: BhapticsKit, didConnect device: BhapticsDevice) {
        print("Connected: \(device.name)")
    }

    func bHapticsKit(_ kit: BhapticsKit, didDisconnect device: BhapticsDevice) {
        print("Disconnected: \(device.name)")
    }
}
Bluetooth no funciona en iOS Simulator ni en visionOS Simulator. Use un dispositivo real para probar los dispositivos hápticos.
Acerca de la posición
Las funciones que reproducen háptica sin eventos reciben position como un Int. El valor se comparte con los demás SDK de bHaptics. Use BhapticsPosition.index para obtenerlo.
BhapticsPosition | index | Dispositivo | Cantidad de motores |
|---|---|---|---|
.Vest | 0 | TactSuit Pro | 32 |
.ForearmL | 1 | TactSleeve(Left) | 3 |
.ForearmR | 2 | TactSleeve(Right) | 3 |
.Head | 3 | TactVisor | 4 |
.HandL | 4 | Tactosy for Hands(Left) | 3 |
.HandR | 5 | Tactosy for Hands(Right) | 3 |
.FootL | 6 | Tactosy for Feet(Left) | 3 |
.FootR | 7 | Tactosy for Feet(Right) | 3 |
.GloveL | 8 | TactGlove(Left) | 8 |
.GloveR | 9 | TactGlove(Right) | 8 |
let motorsCount = 32  // TactSuit Pro has 32 motors
let strength = 50     // 50% strength
let duration = 400    // 400 milliseconds

kit.playDot(position: BhapticsPosition.Vest.index, durationMillis: duration, arr: [Int](repeating: strength, count: motorsCount))
Lectura adicional
¡Ya está listo para usar la función háptica de bHaptics! Visite nuestra Referencia de Swift para reproducir hápticos en su proyecto, o consulte el código de ejemplo completo a continuación.
Si tiene problemas para usar esta biblioteca, consulte Solución de problemas.
Código de ejemplo completo
El siguiente ejemplo es una aplicación SwiftUI que inicializa el SDK, muestra los dispositivos cercanos para emparejarlos y reproduce hápticos.
El ejemplo usa .task y Section de SwiftUI, por lo que requiere iOS 15 / macOS 12 o posterior (el SDK en sí es compatible con iOS 13 y versiones posteriores).
import SwiftUI
import BhapticsPlugin

final class HapticViewModel: ObservableObject, BhapticsKitDelegate {
    // Replace with your App ID and API Key from the bHaptics Developer Portal.
    private let appId = "your_app_id"
    private let apiKey = "your_api_key"

    private var kit: BhapticsKit!

    @Published var status = "Not initialized"
    @Published var devices: [BhapticsDevice] = []
    @Published var events: [String] = []

    init() {
        kit = BhapticsKit(delegate: self)
        devices = kit.getDevices()
    }

    // 1. Initialize
    @MainActor
    func initialize() async {
        status = "Initializing..."
        let result = await kit.initialize(appId: appId, apiKey: apiKey, defaultSetting: "")
        status = result ? "Initialized" : "Initialization failed"
        events = kit.getEventList().sorted()
        devices = kit.getDevices()
    }

    // 2. Pair devices
    func togglePair(_ device: BhapticsDevice) {
        if device.paired {
            kit.unpair(device: device)
        } else {
            kit.pair(device: device)
        }
    }

    // 3. Play haptics
    func play(_ event: String) {
        _ = kit.play(eventId: event)
    }

    func playDot() {
        // First 16 of the TactSuit Pro's 32 motors.
        let motors = [Int](repeating: 50, count: 16) + [Int](repeating: 0, count: 16)
        kit.playDot(position: BhapticsPosition.Vest.index, durationMillis: 1000, arr: motors)
    }

    func stopAll() {
        kit.stopAll()
    }

    // BhapticsKitDelegate
    func bHapticsKit(_ kit: BhapticsKit, bleStateChange state: Bool) {
        if state { kit.scan() }
    }

    func bHapticsKit(_ kit: BhapticsKit, deviceStateUpdated devices: [BhapticsDevice]) {
        self.devices = devices
    }

    func bHapticsKit(_ kit: BhapticsKit, didConnect device: BhapticsDevice) {
        devices = kit.getDevices()
    }

    func bHapticsKit(_ kit: BhapticsKit, didDisconnect device: BhapticsDevice) {
        devices = kit.getDevices()
    }
}

struct ContentView: View {
    @StateObject private var viewModel = HapticViewModel()

    var body: some View {
        List {
            Section("Status") {
                Text(viewModel.status)
            }
            Section("Devices") {
                ForEach(viewModel.devices) { device in
                    Button {
                        viewModel.togglePair(device)
                    } label: {
                        HStack {
                            Text(device.name)
                            Spacer()
                            Text(device.connected ? "Connected" : device.paired ? "Paired" : "Tap to pair")
                        }
                    }
                }
            }
            Section("Events") {
                ForEach(viewModel.events, id: \.self) { event in
                    Button(event) { viewModel.play(event) }
                }
            }
            Section {
                Button("Play dot") { viewModel.playDot() }
                Button("Stop all") { viewModel.stopAll() }
            }
        }
        .task { await viewModel.initialize() }
    }
}
Si desea explorar más ejemplos, consulte la aplicación de ejemplo en nuestro repositorio oficial de GitHub.