Guide pour JavaScript
Avec notre SDK JavaScript, vous pouvez implémenter le retour haptique dans votre projet JS/TS. Le système de types pour TypeScript ainsi que les ESM sont également pris en charge.
- Installer le paquet
- Configurer l'environnement haptique
Prérequis
- Node.js (la dernière version LTS est recommandée)
- OS : Windows 10/11 (x64), macOS (Apple Silicon)
- bHaptics Player installé et en cours d'exécution
- Une application haptique déployée correspondant à votre projet
- L'App ID et l'API Key de l'application haptique
tact-js s'exécute uniquement dans le navigateur. Utilisez-le dans une application web regroupée par un outil tel que Vite.
About haptic application
You can create and manage haptic apps in Developer Portal, a web-based tool.
If you're unfamiliar with haptic apps or haven't created one yet, please follow the Portal guide before proceeding.
Before linking a haptic app to your game project, make sure the haptic app meets the following requirements:
- At least one haptic event must be created.
- API Key must be generated.
- There is no API Key by default. To generate one, go to the "API Key" tab and click "New" button.
- Haptic app must be deployed
- If you see "Deploy Now" button in the upper right corner, click it to deploy your haptic app. Otherwise, if you can see "Up to date", it means that the latest haptic app has already been deployed.
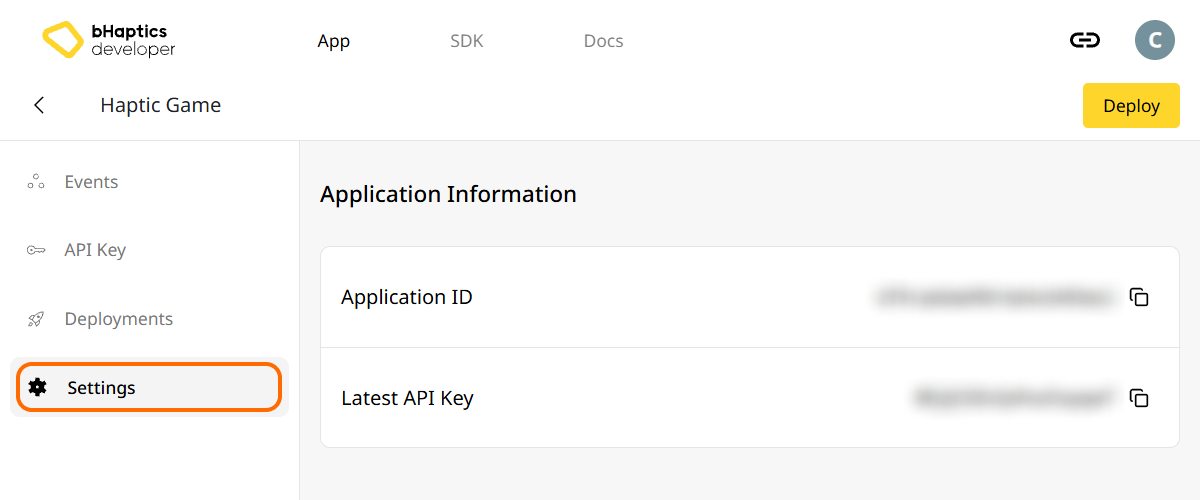
Also, link process requires App ID and API Key. Go to the "Settings" tab, and check the App ID and API Key.
Installation
- npm
- yarn
- pnpm
npm install tact-js
yarn add tact-js
pnpm add tact-js
Importer les paquets
import Tact from "tact-js";
Exclure pour l'optimisation
Si vous utilisez Vite, ajoutez ce qui suit à votre fichier de configuration Vite :
export default defineConfig({
  // ...
  optimizeDeps: {
    exclude: ['tact-js'],
  },
  // ...
});
Configurer l'environnement haptique
Avant d'utiliser toute fonction liée au retour haptique, vous devez lier l'application haptique à votre projet et initialiser l'environnement haptique.
Pour cela, vous avez besoin de l'App ID et de l'API Key de votre application haptique. Vous pouvez les obtenir depuis le bHaptics Developer Portal.
Initialiser
- Remplacez
"your_app_id"et"your_api_key"par votre App ID et votre API Key. - Avant de lancer le projet JavaScript, assurez-vous que l'application bHaptics Player est en cours d'exécution sur votre ordinateur.
import Tact from "tact-js";

const initTact = async () => {
  const result = await Tact.init({
    appId: "your_app_id",
    apiKey: "your_api_key",
  });

  console.log(result ? "Connection Success!" : "Connection Failed...");
}
Pour aller plus loin
Vous êtes maintenant prêt à utiliser la fonctionnalité de retour haptique de bHaptics ! Consultez notre référence JavaScript pour lire des haptiques dans votre projet, ou reportez-vous au code d'exemple complet ci-dessous.
Si vous rencontrez des difficultés pour utiliser cette bibliothèque, consultez la section Dépannage.
Code d'exemple complet
L'exemple ci-dessous utilise Vite, car tact-js s'exécute dans le navigateur. Assurez-vous que bHaptics Player est en cours d'exécution avant d'ouvrir la page.
<!doctype html>
<html lang="en">
  <head>
    <meta charset="UTF-8" />
    <title>bHaptics tact-js example</title>
  </head>
  <body>
    <button id="play">Play haptic</button>
    <pre id="log"></pre>
    <script type="module" src="/src/main.js"></script>
  </body>
</html>
import Tact, { PositionType } from "tact-js";

// Replace with your App ID and API Key from the bHaptics Developer Portal.
const APP_ID = "your_app_id";
const API_KEY = "your_api_key";

const logEl = document.getElementById("log");
const log = (msg) => {
  console.log(msg);
  logEl.textContent += msg + "\n";
};

const sleep = (ms) => new Promise((resolve) => setTimeout(resolve, ms));

let ready = false;

// 1. Initialize on load. bHaptics Player must already be running.
const initialize = async () => {
  log("Initializing bHaptics SDK...");
  ready = await Tact.init({ appId: APP_ID, apiKey: API_KEY });
  log(ready ? "Connected to bHaptics Player." : "Failed to connect. Is bHaptics Player running?");

  if (ready) {
    const devices = await Tact.getConnectedDevices();
    log(`Connected devices: ${JSON.stringify(devices)}`);
  }
};

// 2. Run a short haptic sequence when the button is clicked.
const runDemo = async () => {
  if (!ready) {
    log("SDK is not ready yet.");
    return;
  }

  // Play dot pattern — first 16 of the TactSuit Pro's 32 motors.
  log("- Playing dot pattern");
  const motorValues = [...Array(16).fill(50), ...Array(16).fill(0)];
  await Tact.playDot({ position: PositionType.Vest, motorValues, duration: 2000 });
  await sleep(2500);

  // Play path pattern.
  log("- Playing path pattern");
  await Tact.playPath({
    position: PositionType.Vest,
    x: [0.2, 0.4, 0.6, 0.8],
    y: [0.2, 0.8, 0.2, 0.8],
    intensity: [80, 60, 80, 60],
    duration: 3000,
  });
  await sleep(3500);

  // Play glove waveform on both hands (if connected).
  log("- Testing glove haptics");
  const motors = new Int32Array([100, 0, 0, 0, 0, 100, 0, 100]);
  const playtimes = new Int32Array([8, 0, 0, 0, 0, 1, 0, 4]);
  const shapes = new Int32Array([2, 0, 0, 0, 0, 0, 0, 0]);
  await Tact.playGlove({ position: PositionType.GloveL, motors, playtimes, shapes, repeatCount: 1 });
  await sleep(1000);
  await Tact.playGlove({ position: PositionType.GloveR, motors, playtimes, shapes, repeatCount: 1 });
  await sleep(1000);

  await Tact.stopAll();
  log("Demo completed");
};

document.getElementById("play").addEventListener("click", runDemo);

initialize();
Pour explorer davantage d'exemples, consultez le README de notre dépôt GitHub officiel.