Guide pour Python
Grâce à notre SDK Python, vous pouvez intégrer les haptiques dans votre projet Python.
- Installer le package
- Configurer l'environnement haptique
Prérequis
- OS : Windows 10/11 (x64), macOS (Apple Silicon)
- Python 3.8 - 3.12
- bHaptics Player installé et en cours d'exécution
- Application haptique déployée correspondant à votre projet
- App ID et API Key de l'application haptique
About haptic application
You can create and manage haptic apps in Developer Portal, a web-based tool.
If you're unfamiliar with haptic apps or haven't created one yet, please follow the Portal guide before proceeding.
Before linking a haptic app to your game project, make sure the haptic app meets the following requirements:
- At least one haptic event must be created.
- API Key must be generated.
- There is no API Key by default. To generate one, go to the "API Key" tab and click "New" button.
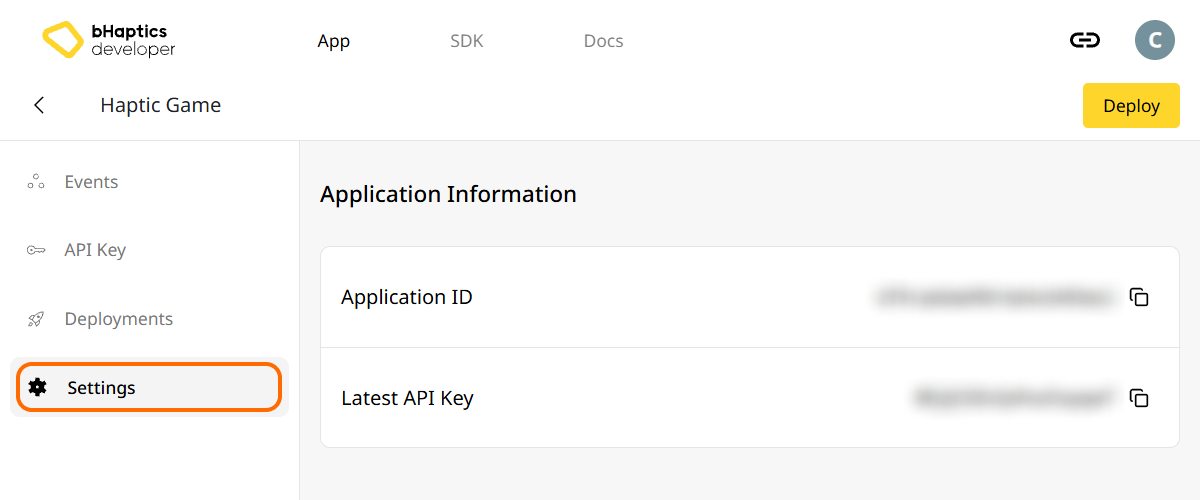
- Haptic app must be deployed
- If you see "Deploy Now" button in the upper right corner, click it to deploy your haptic app. Otherwise, if you can see "Up to date", it means that the latest haptic app has already been deployed.
Also, link process requires App ID and API Key. Go to the "Settings" tab, and check the App ID and API Key.
Installation
Installez le bHaptics Python SDK via pip depuis PyPI :
pip install bhaptics-python
Importer les packages
# bHaptics SDK
import bhaptics_python

# Coroutine
import asyncio
Vous devez également importer le package asyncio car la plupart des fonctions sont des coroutines.
Configurer l'environnement haptique
Avant d'utiliser des fonctions liées aux haptiques, vous devez lier l'application haptique à votre projet et initialiser l'environnement haptique.
Pour ce faire, vous avez besoin de l'App ID et de l'API Key de votre application haptique. Vous pouvez les obtenir depuis le bHaptics Developer Portal.
Initialiser
- Remplacez
"your_app_id"et"your_api_key"par votre App ID et votre API Key. - Avant de lancer le script Python, assurez-vous que l'application bHaptics Player est en cours d'exécution sur votre ordinateur.
import bhaptics_python
import asyncio

async def main():
    app_id = "your_app_id"        # Replace with your App ID
    api_key = "your_api_key"      # Replace with your API key

    # Initialize SDK
    result = await bhaptics_python.registry_and_initialize(app_id, api_key, "")
    print(f"Initialization result: {result}")

    # Example: Play a haptic event
    event_name = "your_event_name"
    request_id = await bhaptics_python.play_event(event_name)
    print(f"Playing event: {event_name}, Request ID: {request_id}")

asyncio.run(main())
À propos de l'index de l'appareil
Le bHaptics SDK prend en charge le contrôle simultané de plusieurs appareils. Vous pouvez cibler tous les appareils ou des appareils spécifiques à l'aide du système d'index d'appareil.
Tous les appareils haptiques ont leur propre index d'appareil. Par défaut, l'index d'appareil est défini sur -1. Vous pouvez modifier l'index d'appareil via bHaptics Player.
- Tous les appareils : Les fonctions sans paramètre
device_indexaffectent tous les appareils non modifiés (index d'appareil égal à-1). - Appareil spécifique : Les fonctions avec le paramètre
device_indexciblent un appareil spécifique.
# Affect all unmodified devices.
await bhaptics_python.play_event(event_name)

# Affect only devices that device index is 0.
await bhaptics_python.play_event(event_name, 0)
Vous pouvez parcourir ou définir les index d'appareil via bHaptics Player.

- En haut à droite, cliquez sur l'icône des paramètres.
- Cliquez sur « Settings ».
- Accédez à l'onglet « Labs ».
- Développez « Device Index ».
Trouvez ensuite l'appareil dans la liste et ajustez l'index en cliquant sur « + » ou « - ».
À propos du type d'appareil
Les différents types d'appareils ont des plages différentes. Utilisez-le lorsque vous avez besoin d'haptiques pour une partie spécifique du corps.
| Valeur | Appareil | Placé sur... | Nombre de moteurs |
|---|---|---|---|
0 | TactSuit Pro | Haut du corps | 32 |
1 | TactSleeve(Left) | Poignet gauche | 3 |
2 | TactSleeve(Right) | Poignet droit | 3 |
3 | TactVisor | Tête | 4 |
4 | Tactosy for Hands(Left) | Main gauche | 3 |
5 | Tactosy for Hands(Right) | Main droite | 3 |
6 | Tactosy for Feet(Left) | Pied gauche | 3 |
7 | Tactosy for Feet(Right) | Pied droit | 3 |
8 | TactGlove(Left) | Main gauche | 8 |
9 | TactGlove(Right) | Main droite | 8 |
La valeur du type d'appareil est utilisée par la fonction haptique qui n'utilise pas d'événement, mais spécifie directement l'intensité de vibration des moteurs.
device_type = 0    # TactSuit Pro
motors_count = 32  # TactSuit Pro has 32 motors

strength = 50      # 50% strength
duration = 400     # 400 milliseconds

await bhaptics_python.play_dot(device_type, duration, [strength] * motors_count)
Pour aller plus loin
Vous êtes maintenant prêt à utiliser la fonctionnalité haptique de bHaptics ! Consultez notre Référence Python pour jouer des haptiques dans votre projet, ou référez-vous au code d'exemple complet ci-dessous.
Si vous rencontrez des problèmes lors de l'utilisation de cette bibliothèque, consultez le Dépannage.
Code d'exemple complet
import bhaptics_python
import asyncio
import time

async def haptic_demo():
    # 1. Initialization
    app_id = "your_app_id"
    api_key = "your_api_key"

    print("🔧 Initializing bHaptics SDK...")
    result = await bhaptics_python.registry_and_initialize(app_id, api_key, "")
    print(f"Initialization result: {result}")

    print("✅ Connected to bHaptics Player.")

    # 2. Check device information
    device_info = await bhaptics_python.get_device_info_json()
    print(f"📱 Connected device info: {device_info}")

    # 3. Test haptic effects
    print("\n🎮 Starting haptic effect tests...")

    # Play dot pattern
    print("• Playing dot pattern")
    values = [50] * 16 + [0] * 16  # Activate first 16 of 32 motors
    await bhaptics_python.play_dot(0, 2000, values)
    await asyncio.sleep(2.5)

    # Play path pattern
    print("• Playing path pattern")
    x = [0.2, 0.4, 0.6, 0.8]
    y = [0.2, 0.8, 0.2, 0.8]
    intensity = [80, 60, 80, 60]
    await bhaptics_python.play_path(0, 3000, x, y, intensity)
    await asyncio.sleep(3.5)

    # Test glove haptics (if available)
    print("• Testing glove haptics")
    glove_motors = [100] * 8
    glove_playtimes = [500] * 8
    glove_shapes = [2] * 8

    # Left hand
    await bhaptics_python.play_glove(8, glove_motors, glove_playtimes, glove_shapes, 0)
    await asyncio.sleep(1)

    # Right hand
    await bhaptics_python.play_glove(9, glove_motors, glove_playtimes, glove_shapes, 0)
    await asyncio.sleep(1)

    # 4. Cleanup
    await bhaptics_python.stop_all()
    await bhaptics_python.close()
    print("🔚 Demo completed")

# Run the demo
if __name__ == "__main__":
    asyncio.run(haptic_demo())
Si vous souhaitez explorer davantage d'exemples, consultez le README de notre dépôt GitHub officiel.
Gestion des erreurs
Encapsulez toujours les appels SDK dans des blocs try-catch pour les applications en production :
try:
    result = await bhaptics_python.registry_and_initialize(app_id, api_key, "")
    if not result:
        print("Failed to initialize bHaptics SDK")
except Exception as e:
    print(f"Error initializing SDK: {e}")