Python ガイド
Python SDK を使用すると、Python プロジェクトにハプティックを実装できます。
- パッケージのインストール
- ハプティック環境のセットアップ
要件
- OS: Windows 10/11 (x64)、macOS (Apple Silicon)
- Python 3.8 - 3.12
- bHaptics Player のインストールと実行
- プロジェクトに対応するデプロイ済みの ハプティックアプリケーション
- ハプティックアプリの App ID と API Key
About haptic application
You can create and manage haptic apps in Developer Portal, a web-based tool.
If you're unfamiliar with haptic apps or haven't created one yet, please follow the Portal guide before proceeding.
Before linking a haptic app to your game project, make sure the haptic app meets the following requirements:
- At least one haptic event must be created.
- API Key must be generated.
- There is no API Key by default. To generate one, go to the "API Key" tab and click "New" button.
- Haptic app must be deployed
- If you see "Deploy Now" button in the upper right corner, click it to deploy your haptic app. Otherwise, if you can see "Up to date", it means that the latest haptic app has already been deployed.
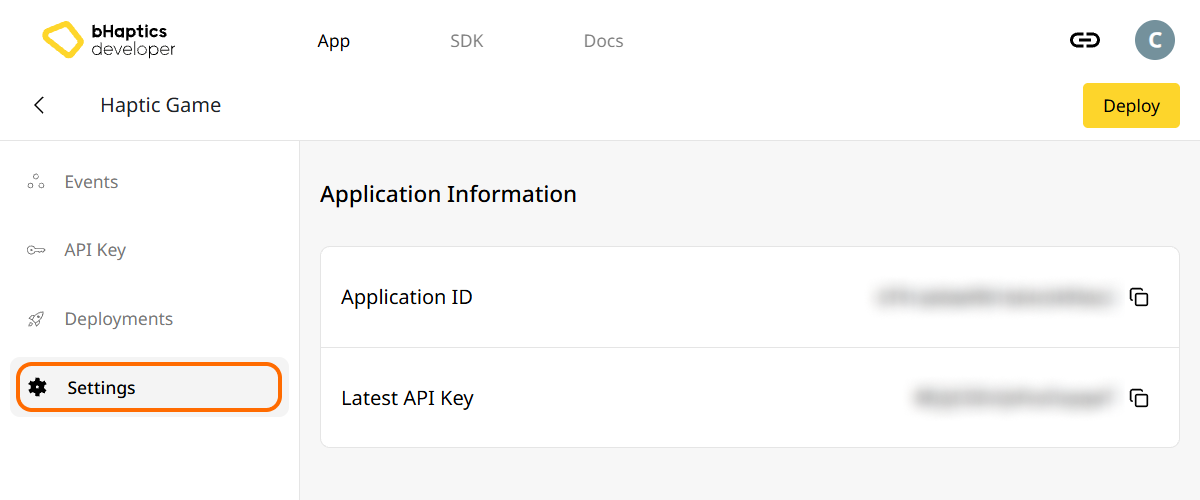
Also, link process requires App ID and API Key. Go to the "Settings" tab, and check the App ID and API Key.
インストール
PyPI から pip を使って bHaptics Python SDK をインストールします:
pip install bhaptics-python
パッケージのインポート
# bHaptics SDK
import bhaptics_python

# Coroutine
import asyncio
ほとんどの関数がコルーチンであるため、asyncio パッケージもインポートする必要があります。
ハプティック環境のセットアップ
ハプティック関連の関数を使用する前に、ハプティックアプリをプロジェクトに連携し、ハプティック環境を初期化する必要があります。
そのためには、ハプティックアプリの App ID と API Key が必要です。これらは bHaptics Developer Portal で取得できます。
初期化
"your_app_id"と"your_api_key"を、ご自身の App ID と API Key に置き換えてください。- Python スクリプトを起動する前に、bHaptics Player アプリケーションがコンピューター上で実行中であることを確認してください。
import bhaptics_python
import asyncio

async def main():
    app_id = "your_app_id"        # Replace with your App ID
    api_key = "your_api_key"      # Replace with your API key

    # Initialize SDK
    result = await bhaptics_python.registry_and_initialize(app_id, api_key, "")
    print(f"Initialization result: {result}")

    # Example: Play a haptic event
    event_name = "your_event_name"
    request_id = await bhaptics_python.play_event(event_name)
    print(f"Playing event: {event_name}, Request ID: {request_id}")

asyncio.run(main())
デバイスインデックスについて
bHaptics SDK は複数のデバイスを同時に制御できます。デバイスインデックスシステムを使用して、すべてのデバイスまたは特定のデバイスを対象に指定できます。
すべてのハプティックデバイスは、固有のデバイスインデックスを持ちます。デフォルトでは、デバイスインデックスは -1 に設定されています。デバイスインデックスは bHaptics Player から変更できます。
- すべてのデバイス:
device_indexパラメーターを持たない関数は、変更されていないすべてのデバイス(デバイスインデックスが-1)に適用されます。 - 特定のデバイス:
device_indexパラメーターを持つ関数は、特定のデバイスを対象とします。
# Affect all unmodified devices.
await bhaptics_python.play_event(event_name)

# Affect only devices that device index is 0.
await bhaptics_python.play_event(event_name, 0)
デバイスインデックスは bHaptics Player で確認または設定できます。
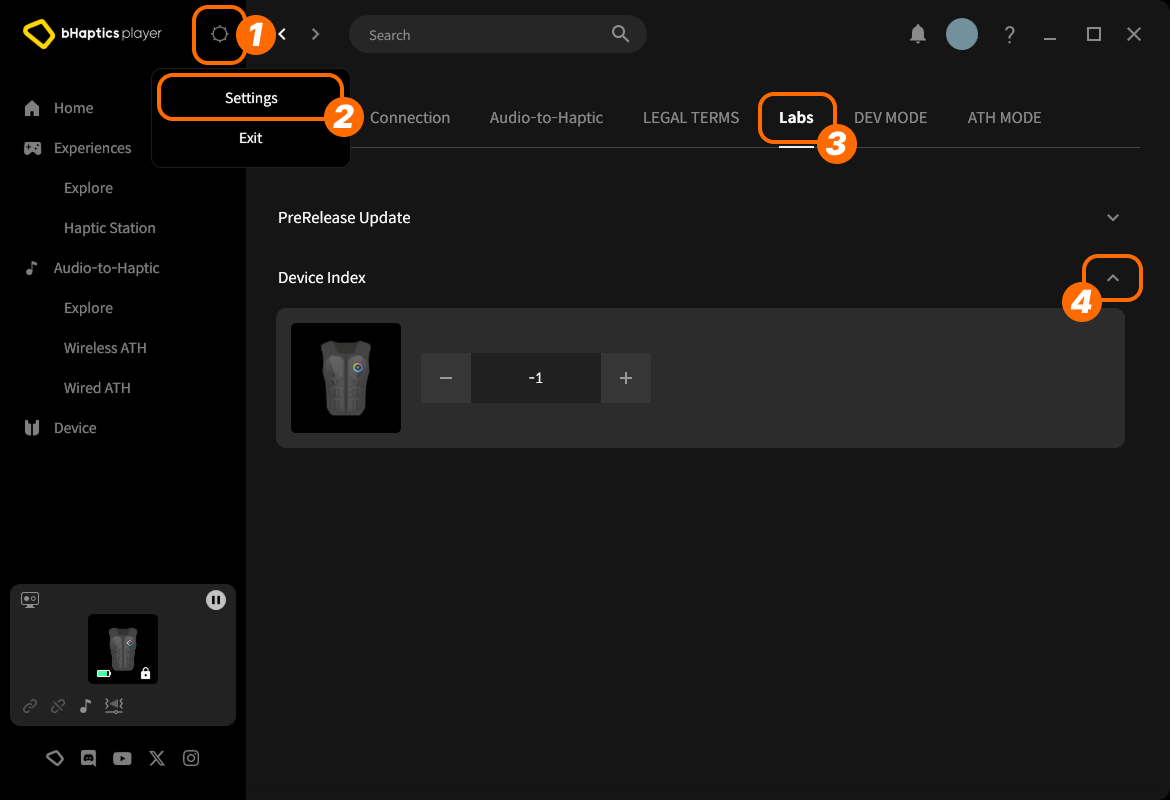
- 右上の setting icon(設定アイコン)をクリックします。
- "Settings" をクリックします。
- "Labs" タブに移動します。
- "Device Index" を展開します。
次に、リストからデバイスを見つけ、"+" または "-" をクリックしてインデックスを調整します。
デバイスタイプについて
デバイスタイプごとに範囲が異なります。特定の身体部位にハプティックが必要なときに使用します。
| 値 | デバイス | 装着位置 | モーター数 |
|---|---|---|---|
0 | TactSuit Pro | 上半身 | 32 |
1 | TactSleeve(Left) | 左手首 | 3 |
2 | TactSleeve(Right) | 右手首 | 3 |
3 | TactVisor | 頭部 | 4 |
4 | Tactosy for Hands(Left) | 左手 | 3 |
5 | Tactosy for Hands(Right) | 右手 | 3 |
6 | Tactosy for Feet(Left) | 左足 | 3 |
7 | Tactosy for Feet(Right) | 右足 | 3 |
8 | TactGlove(Left) | 左手 | 8 |
9 | TactGlove(Right) | 右手 | 8 |
デバイスタイプの値は、イベントを使用せずにモーターの振動の強さを直接指定するハプティック関数で使用されます。
device_type = 0    # TactSuit Pro
motors_count = 32  # TactSuit Pro has 32 motors

strength = 50      # 50% strength
duration = 400     # 400 milliseconds

await bhaptics_python.play_dot(device_type, duration, [strength] * motors_count)
さらに読む
これで bHaptics のハプティック機能を使用する準備が整いました!プロジェクトでハプティックを再生するには Python リファレンス をご覧いただくか、以下の完全なサンプルコードを参考にしてください。
このライブラリの使用で問題が発生した場合は、トラブルシューティング を確認してください。
完全なサンプルコード
import bhaptics_python
import asyncio
import time

async def haptic_demo():
    # 1. Initialization
    app_id = "your_app_id"
    api_key = "your_api_key"

    print("🔧 Initializing bHaptics SDK...")
    result = await bhaptics_python.registry_and_initialize(app_id, api_key, "")
    print(f"Initialization result: {result}")

    print("✅ Connected to bHaptics Player.")

    # 2. Check device information
    device_info = await bhaptics_python.get_device_info_json()
    print(f"📱 Connected device info: {device_info}")

    # 3. Test haptic effects
    print("\n🎮 Starting haptic effect tests...")

    # Play dot pattern
    print("• Playing dot pattern")
    values = [50] * 16 + [0] * 16  # Activate first 16 of 32 motors
    await bhaptics_python.play_dot(0, 2000, values)
    await asyncio.sleep(2.5)

    # Play path pattern
    print("• Playing path pattern")
    x = [0.2, 0.4, 0.6, 0.8]
    y = [0.2, 0.8, 0.2, 0.8]
    intensity = [80, 60, 80, 60]
    await bhaptics_python.play_path(0, 3000, x, y, intensity)
    await asyncio.sleep(3.5)

    # Test glove haptics (if available)
    print("• Testing glove haptics")
    glove_motors = [100] * 8
    glove_playtimes = [500] * 8
    glove_shapes = [2] * 8

    # Left hand
    await bhaptics_python.play_glove(8, glove_motors, glove_playtimes, glove_shapes, 0)
    await asyncio.sleep(1)

    # Right hand
    await bhaptics_python.play_glove(9, glove_motors, glove_playtimes, glove_shapes, 0)
    await asyncio.sleep(1)

    # 4. Cleanup
    await bhaptics_python.stop_all()
    await bhaptics_python.close()
    print("🔚 Demo completed")

# Run the demo
if __name__ == "__main__":
    asyncio.run(haptic_demo())
より多くのサンプルを確認したい場合は、公式 GitHub リポジトリの README を確認してください。
エラー処理
本番環境のアプリケーションでは、常に SDK の呼び出しを try-catch ブロックで囲んでください:
try:
    result = await bhaptics_python.registry_and_initialize(app_id, api_key, "")
    if not result:
        print("Failed to initialize bHaptics SDK")
except Exception as e:
    print(f"Error initializing SDK: {e}")