Swift ガイド
Swift SDK を使用すると、iOS、visionOS、macOS アプリにハプティックを実装できます。
- パッケージのインストール
- ハプティック環境のセットアップ
- デバイスの接続
要件
- Xcode 16 以降
- OS: iOS 13.0+、visionOS 2.0+、macOS 10.15+
- 初期化時にハプティックイベントをダウンロードするためのインターネット接続
- macOS のみ: bHaptics Player のインストールと実行
- プロジェクトに対応するデプロイ済みの ハプティックアプリケーション
- ハプティックアプリの App ID と API Key
- iOS / visionOS: SDK は Bluetooth LE を介してハプティックデバイスに直接接続します。コンパニオンアプリは必要ありません。
- macOS: SDK は bHaptics Player に接続し、bHaptics Player がハプティックデバイスを管理します。デバイスは bHaptics Player でペアリングしてください。
すべてのプラットフォームで同じ API を使用できます。
About haptic application
You can create and manage haptic apps in Developer Portal, a web-based tool.
If you're unfamiliar with haptic apps or haven't created one yet, please follow the Portal guide before proceeding.
Before linking a haptic app to your game project, make sure the haptic app meets the following requirements:
- At least one haptic event must be created.
- API Key must be generated.
- There is no API Key by default. To generate one, go to the "API Key" tab and click "New" button.
- Haptic app must be deployed
- If you see "Deploy Now" button in the upper right corner, click it to deploy your haptic app. Otherwise, if you can see "Up to date", it means that the latest haptic app has already been deployed.
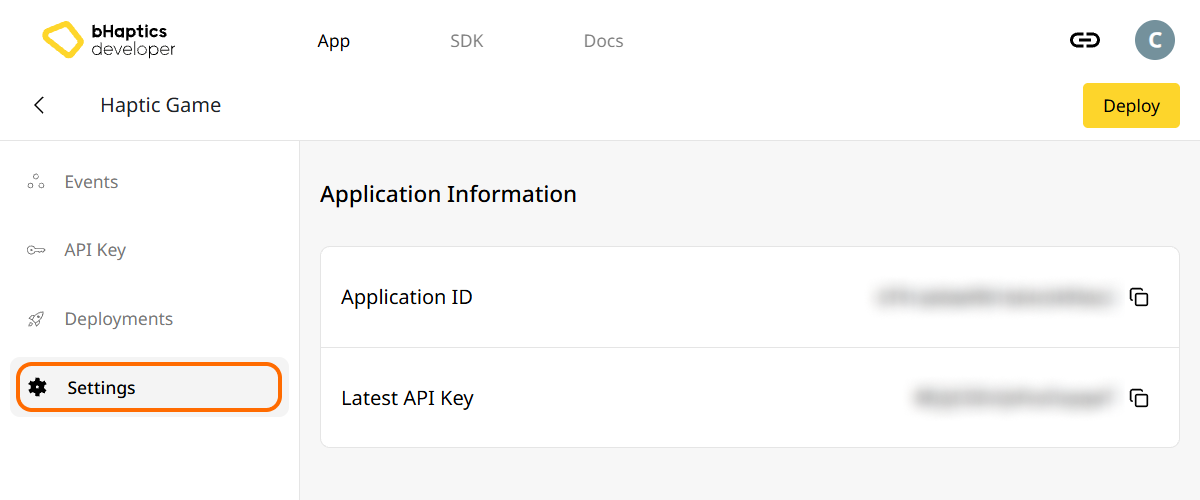
Also, link process requires App ID and API Key. Go to the "Settings" tab, and check the App ID and API Key.
インストール
Swift Package Manager を使って bHaptics Swift SDK をインストールします。
- Xcode で File > Add Package Dependencies... を選択します。
- パッケージ URL を入力します:
https://github.com/bhaptics/bhaptics-ios - Dependency Rule を
1.0.1からの Up to Next Major Version に設定します。 Bhapticsライブラリをアプリのターゲットに追加します。
Package.swift で依存関係を管理している場合は、次のようにパッケージを追加します:
dependencies: [
    .package(url: "https://github.com/bhaptics/bhaptics-ios", .upToNextMajor(from: "1.0.1"))
],
targets: [
    .target(
        name: "YourApp",
        dependencies: [.product(name: "Bhaptics", package: "bhaptics-ios")]
    )
]
パッケージのインポート
import BhapticsPlugin
Bluetooth の権限
iOS / visionOS: アプリのターゲットの Info 設定に NSBluetoothAlwaysUsageDescription(Privacy - Bluetooth Always Usage Description)を追加し、アプリが Bluetooth を使用する理由を説明するメッセージを設定してください。権限の確認ダイアログは BhapticsKit を作成したときに表示されます。このキーがないと、SDK が Bluetooth にアクセスした時点でアプリがクラッシュします。
macOS: App Sandbox が有効になっている場合は、Signing & Capabilities > App Sandbox に移動し、SDK が bHaptics Player に接続できるように Outgoing Connections (Client) にチェックを入れてください。
ハプティック環境のセットアップ
ハプティック関連の関数を使用する前に、ハプティックアプリをプロジェクトに連携し、ハプティック環境を初期化する必要があります。
そのためには、ハプティックアプリの App ID と API Key が必要です。これらは bHaptics Developer Portal で取得できます。
初期化
"your_app_id"と"your_api_key"を、ご自身の App ID と API Key に置き換えてください。BhapticsKitのインスタンスを 1 つだけ作成し、アプリのライフタイム全体を通して保持してください。
import BhapticsPlugin

let kit = BhapticsKit()

Task {
    let result = await kit.initialize(appId: "your_app_id", apiKey: "your_api_key", defaultSetting: "")
    print("Initialization result: \(result)")

    // Example: Play a haptic event
    let requestId = kit.play(eventId: "your_event_name")
    print("Request ID: \(requestId)")
}
iOS と visionOS では、initialize はハプティックアプリのハプティックイベントをサーバーからダウンロードします。macOS では bHaptics Player に接続するため、initialize を呼び出す前に bHaptics Player を起動しておいてください。
デバイスの接続
この手順は iOS と visionOS 専用です。macOS では、bHaptics Player でデバイスをペアリングしてください。
SDK は Bluetooth LE を介して近くの bHaptics デバイスを検出します。一度デバイスをペアリングすると、SDK はそのデバイスを記憶し、以降のスキャンで検出されたときに自動的に再接続します。
- Bluetooth の準備が整うまで待ってから、
scan()を呼び出します。 - 検出されたデバイスをユーザーに表示し、ユーザーが選択したデバイスに対して
pair(device:)を呼び出します。 - 完了したら
stopScan()を呼び出します。
Bluetooth の準備が整ったときやデバイスリストが変更されたときに通知を受け取るには、BhapticsKitDelegate を実装します。
import BhapticsPlugin

final class HapticManager: BhapticsKitDelegate {
    private var kit: BhapticsKit!
    private(set) var devices: [BhapticsDevice] = []

    init() {
        kit = BhapticsKit(delegate: self)
    }

    func pair(_ device: BhapticsDevice) {
        kit.pair(device: device)
    }

    // Bluetooth is ready. Start scanning.
    func bHapticsKit(_ kit: BhapticsKit, bleStateChange state: Bool) {
        if state {
            kit.scan()
        }
    }

    // Found, paired, connected, or disconnected devices.
    func bHapticsKit(_ kit: BhapticsKit, deviceStateUpdated devices: [BhapticsDevice]) {
        self.devices = devices
    }

    func bHapticsKit(_ kit: BhapticsKit, didConnect device: BhapticsDevice) {
        print("Connected: \(device.name)")
    }

    func bHapticsKit(_ kit: BhapticsKit, didDisconnect device: BhapticsDevice) {
        print("Disconnected: \(device.name)")
    }
}
iOS Simulator と visionOS Simulator では Bluetooth が動作しません。ハプティックデバイスのテストには実機を使用してください。
Position について
イベントを使わずにハプティックを再生する関数は、position を Int として受け取ります。この値は他の bHaptics SDK と共通です。値を取得するには BhapticsPosition.index を使用してください。
BhapticsPosition | index | デバイス | モーター数 |
|---|---|---|---|
.Vest | 0 | TactSuit Pro | 32 |
.ForearmL | 1 | TactSleeve(Left) | 3 |
.ForearmR | 2 | TactSleeve(Right) | 3 |
.Head | 3 | TactVisor | 4 |
.HandL | 4 | Tactosy for Hands(Left) | 3 |
.HandR | 5 | Tactosy for Hands(Right) | 3 |
.FootL | 6 | Tactosy for Feet(Left) | 3 |
.FootR | 7 | Tactosy for Feet(Right) | 3 |
.GloveL | 8 | TactGlove(Left) | 8 |
.GloveR | 9 | TactGlove(Right) | 8 |
let motorsCount = 32  // TactSuit Pro has 32 motors
let strength = 50     // 50% strength
let duration = 400    // 400 milliseconds

kit.playDot(position: BhapticsPosition.Vest.index, durationMillis: duration, arr: [Int](repeating: strength, count: motorsCount))
さらに読む
これで bHaptics のハプティック機能を使用する準備が整いました!プロジェクトでハプティックを再生するには Swift リファレンス をご覧いただくか、以下の完全なサンプルコードを参考にしてください。
このライブラリの使用で問題が発生した場合は、トラブルシューティング を確認してください。
完全なサンプルコード
以下は、SDK を初期化し、ペアリング可能な近くのデバイスを一覧表示して、ハプティックを再生する SwiftUI アプリの例です。
この例は SwiftUI の .task と Section を使用しているため、iOS 15 / macOS 12 以降が必要です(SDK 自体は iOS 13 以降に対応しています)。
import SwiftUI
import BhapticsPlugin

final class HapticViewModel: ObservableObject, BhapticsKitDelegate {
    // Replace with your App ID and API Key from the bHaptics Developer Portal.
    private let appId = "your_app_id"
    private let apiKey = "your_api_key"

    private var kit: BhapticsKit!

    @Published var status = "Not initialized"
    @Published var devices: [BhapticsDevice] = []
    @Published var events: [String] = []

    init() {
        kit = BhapticsKit(delegate: self)
        devices = kit.getDevices()
    }

    // 1. Initialize
    @MainActor
    func initialize() async {
        status = "Initializing..."
        let result = await kit.initialize(appId: appId, apiKey: apiKey, defaultSetting: "")
        status = result ? "Initialized" : "Initialization failed"
        events = kit.getEventList().sorted()
        devices = kit.getDevices()
    }

    // 2. Pair devices
    func togglePair(_ device: BhapticsDevice) {
        if device.paired {
            kit.unpair(device: device)
        } else {
            kit.pair(device: device)
        }
    }

    // 3. Play haptics
    func play(_ event: String) {
        _ = kit.play(eventId: event)
    }

    func playDot() {
        // First 16 of the TactSuit Pro's 32 motors.
        let motors = [Int](repeating: 50, count: 16) + [Int](repeating: 0, count: 16)
        kit.playDot(position: BhapticsPosition.Vest.index, durationMillis: 1000, arr: motors)
    }

    func stopAll() {
        kit.stopAll()
    }

    // BhapticsKitDelegate
    func bHapticsKit(_ kit: BhapticsKit, bleStateChange state: Bool) {
        if state { kit.scan() }
    }

    func bHapticsKit(_ kit: BhapticsKit, deviceStateUpdated devices: [BhapticsDevice]) {
        self.devices = devices
    }

    func bHapticsKit(_ kit: BhapticsKit, didConnect device: BhapticsDevice) {
        devices = kit.getDevices()
    }

    func bHapticsKit(_ kit: BhapticsKit, didDisconnect device: BhapticsDevice) {
        devices = kit.getDevices()
    }
}

struct ContentView: View {
    @StateObject private var viewModel = HapticViewModel()

    var body: some View {
        List {
            Section("Status") {
                Text(viewModel.status)
            }
            Section("Devices") {
                ForEach(viewModel.devices) { device in
                    Button {
                        viewModel.togglePair(device)
                    } label: {
                        HStack {
                            Text(device.name)
                            Spacer()
                            Text(device.connected ? "Connected" : device.paired ? "Paired" : "Tap to pair")
                        }
                    }
                }
            }
            Section("Events") {
                ForEach(viewModel.events, id: \.self) { event in
                    Button(event) { viewModel.play(event) }
                }
            }
            Section {
                Button("Play dot") { viewModel.playDot() }
                Button("Stop all") { viewModel.stopAll() }
            }
        }
        .task { await viewModel.initialize() }
    }
}
さらに多くのサンプルを確認したい場合は、公式 GitHub リポジトリ のサンプルアプリを確認してください。