Python 指南
使用我们的 Python SDK,你可以将触觉功能集成到你的 Python 项目中。
- 安装软件包
- 设置触觉环境
要求
- OS: Windows 10/11 (x64), macOS (Apple Silicon)
- Python 3.8 - 3.12
- 已安装并正在运行 bHaptics Player
- 与你的项目对应的已部署触觉应用程序
- 触觉应用的 App ID 和 API Key
About haptic application
You can create and manage haptic apps in Developer Portal, a web-based tool.
If you're unfamiliar with haptic apps or haven't created one yet, please follow the Portal guide before proceeding.
Before linking a haptic app to your game project, make sure the haptic app meets the following requirements:
- At least one haptic event must be created.
- API Key must be generated.
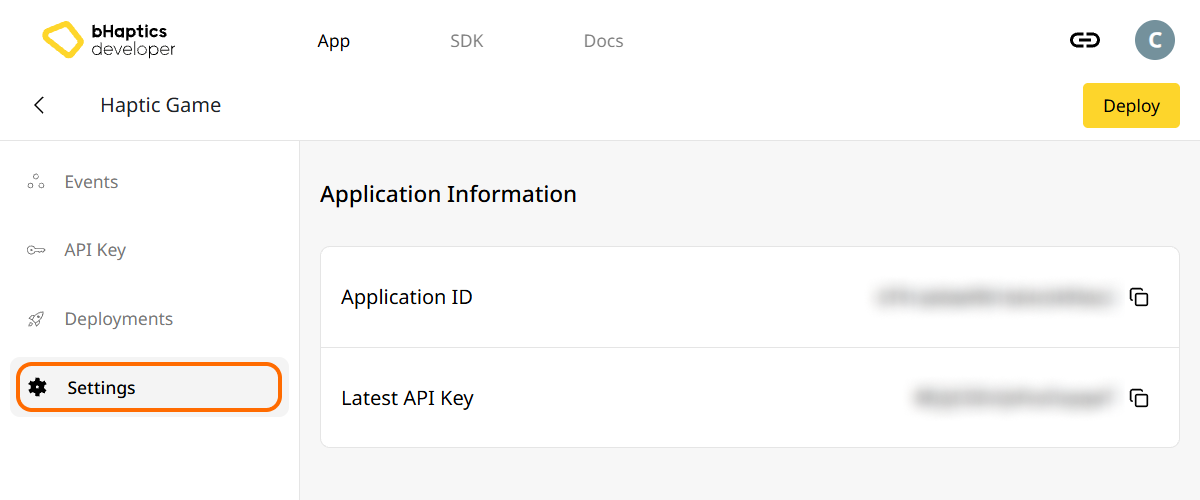
- There is no API Key by default. To generate one, go to the "API Key" tab and click "New" button.
- Haptic app must be deployed
- If you see "Deploy Now" button in the upper right corner, click it to deploy your haptic app. Otherwise, if you can see "Up to date", it means that the latest haptic app has already been deployed.
Also, link process requires App ID and API Key. Go to the "Settings" tab, and check the App ID and API Key.
安装
通过 pip 从 PyPI 安装 bHaptics Python SDK:
pip install bhaptics-python
导入软件包
# bHaptics SDK
import bhaptics_python

# Coroutine
import asyncio
由于大多数函数都是协程,你还需要导入 asyncio 软件包。
设置触觉环境
在使用任何触觉相关函数之前,你需要将触觉应用关联到你的项目,并初始化触觉环境。
为此,你需要触觉应用的 App ID 和 API Key。你可以从 bHaptics Developer Portal 获取它们。
初始化
- 将
"your_app_id"和"your_api_key"替换为你自己的 App ID 和 API Key。 - 在启动 Python 脚本之前,请确保 bHaptics Player 应用程序正在你的计算机上运行。
import bhaptics_python
import asyncio

async def main():
    app_id = "your_app_id"        # Replace with your App ID
    api_key = "your_api_key"      # Replace with your API key

    # Initialize SDK
    result = await bhaptics_python.registry_and_initialize(app_id, api_key, "")
    print(f"Initialization result: {result}")

    # Example: Play a haptic event
    event_name = "your_event_name"
    request_id = await bhaptics_python.play_event(event_name)
    print(f"Playing event: {event_name}, Request ID: {request_id}")

asyncio.run(main())
关于设备索引
bHaptics SDK 支持同时控制多个设备。你可以使用设备索引系统将所有设备或特定设备作为目标。
每个触觉设备都有自己的设备索引。默认情况下,设备索引设置为 -1。你可以通过 bHaptics Player 修改设备索引。
- 所有设备:不带
device_index参数的函数会作用于所有未修改的设备(设备索引为-1)。 - 特定设备:带
device_index参数的函数会作用于特定设备。
# Affect all unmodified devices.
await bhaptics_python.play_event(event_name)

# Affect only devices that device index is 0.
await bhaptics_python.play_event(event_name, 0)
你可以在 bHaptics Player 中浏览或设置设备索引。
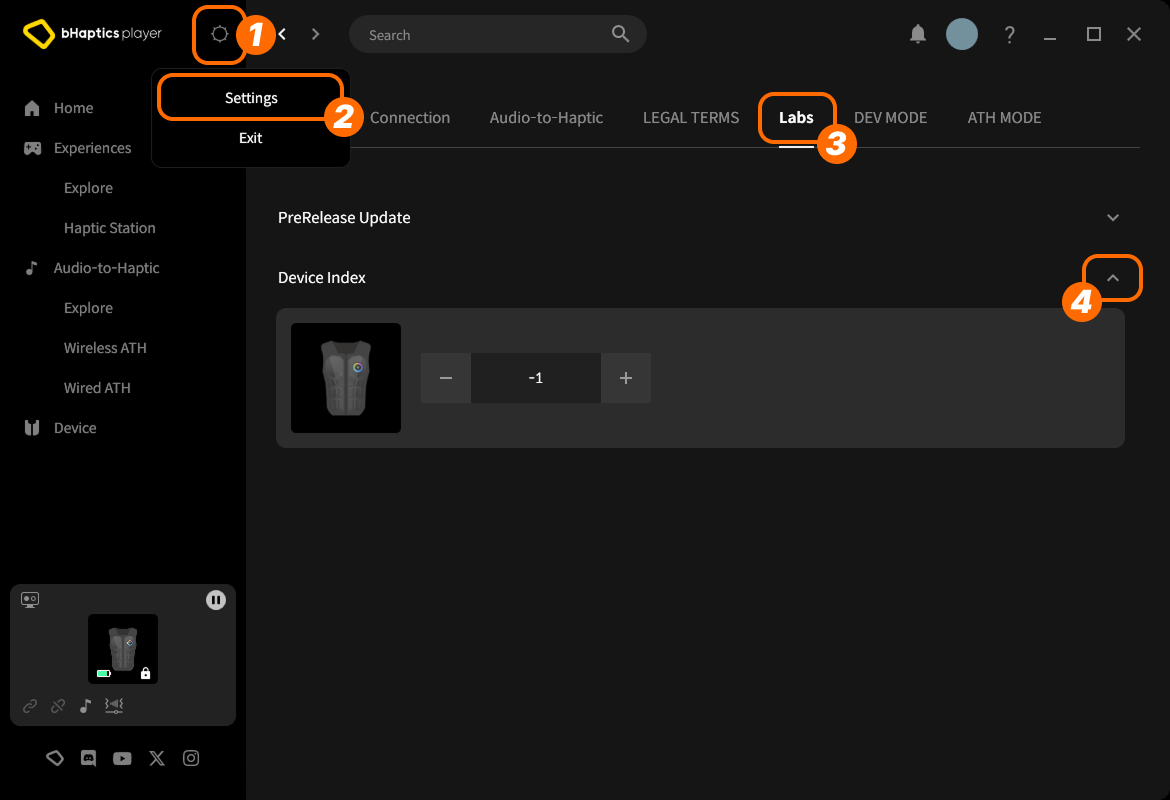
- 在右上角点击 setting icon(设置图标)。
- 点击 "Settings"。
- 进入 "Labs" 选项卡。
- 展开 "Device Index"。
然后在列表中找到该设备,点击 "+" 或 "-" 来调整索引。
关于设备类型
不同的设备类型有不同的范围。当你需要针对特定身体部位的触觉时使用它。
| 值 | 设备 | 穿戴位置 | 马达数量 |
|---|---|---|---|
0 | TactSuit Pro | 上半身 | 32 |
1 | TactSleeve(Left) | 左手腕 | 3 |
2 | TactSleeve(Right) | 右手腕 | 3 |
3 | TactVisor | 头部 | 4 |
4 | Tactosy for Hands(Left) | 左手 | 3 |
5 | Tactosy for Hands(Right) | 右手 | 3 |
6 | Tactosy for Feet(Left) | 左脚 | 3 |
7 | Tactosy for Feet(Right) | 右脚 | 3 |
8 | TactGlove(Left) | 左手 | 8 |
9 | TactGlove(Right) | 右手 | 8 |
设备类型值用于不使用事件、而是直接指定马达振动强度的触觉函数。
device_type = 0    # TactSuit Pro
motors_count = 32  # TactSuit Pro has 32 motors

strength = 50      # 50% strength
duration = 400     # 400 milliseconds

await bhaptics_python.play_dot(device_type, duration, [strength] * motors_count)
延伸阅读
现在你已经准备好使用 bHaptics 触觉功能了!要在你的项目中播放触觉,请访问我们的 Python 参考,或参考下面的完整示例代码。
如果你在使用此库时遇到问题,请查看故障排除。
完整示例代码
import bhaptics_python
import asyncio
import time

async def haptic_demo():
    # 1. Initialization
    app_id = "your_app_id"
    api_key = "your_api_key"

    print("🔧 Initializing bHaptics SDK...")
    result = await bhaptics_python.registry_and_initialize(app_id, api_key, "")
    print(f"Initialization result: {result}")

    print("✅ Connected to bHaptics Player.")

    # 2. Check device information
    device_info = await bhaptics_python.get_device_info_json()
    print(f"📱 Connected device info: {device_info}")

    # 3. Test haptic effects
    print("\n🎮 Starting haptic effect tests...")

    # Play dot pattern
    print("• Playing dot pattern")
    values = [50] * 16 + [0] * 16  # Activate first 16 of 32 motors
    await bhaptics_python.play_dot(0, 2000, values)
    await asyncio.sleep(2.5)

    # Play path pattern
    print("• Playing path pattern")
    x = [0.2, 0.4, 0.6, 0.8]
    y = [0.2, 0.8, 0.2, 0.8]
    intensity = [80, 60, 80, 60]
    await bhaptics_python.play_path(0, 3000, x, y, intensity)
    await asyncio.sleep(3.5)

    # Test glove haptics (if available)
    print("• Testing glove haptics")
    glove_motors = [100] * 8
    glove_playtimes = [500] * 8
    glove_shapes = [2] * 8

    # Left hand
    await bhaptics_python.play_glove(8, glove_motors, glove_playtimes, glove_shapes, 0)
    await asyncio.sleep(1)

    # Right hand
    await bhaptics_python.play_glove(9, glove_motors, glove_playtimes, glove_shapes, 0)
    await asyncio.sleep(1)

    # 4. Cleanup
    await bhaptics_python.stop_all()
    await bhaptics_python.close()
    print("🔚 Demo completed")

# Run the demo
if __name__ == "__main__":
    asyncio.run(haptic_demo())
如果你想探索更多示例,请查看我们官方 GitHub 仓库的 README。
错误处理
在生产应用程序中,请务必将 SDK 调用包裹在 try-catch 块中:
try:
    result = await bhaptics_python.registry_and_initialize(app_id, api_key, "")
    if not result:
        print("Failed to initialize bHaptics SDK")
except Exception as e:
    print(f"Error initializing SDK: {e}")