Unreal 指南
使用我们的 Unreal SDK 插件,您可以在使用 Unreal 制作的内容中实现触觉。
- 导入 SDK 插件
- 连接触觉应用
- 设置触觉环境
- (可选)为 C++ 做准备
要求
- 开发环境
- OS: Windows 10/11 (x64), macOS (Apple Silicon) (目前处于 Beta 阶段)
- Unreal Engine 5.2 - 5.8
- 已安装 bHaptics Player
- 已部署与您的游戏对应的触觉应用程序
- 触觉应用的 App ID 和 API Key
- 运行时环境
- OS: Windows 10/11 (x64), Android(仅限 VR 头显), PS5
- 支持的头显:Meta Quest 2/3/3S/Pro, Pico 4/4 Pro/4 Ultra, HTC VIVE Focus 3/Focus Vision/XR Elite
- 头显上必须已安装 bHaptics VR Player。
- OS: Windows 10/11 (x64), Android(仅限 VR 头显), PS5
如果您需要支持 5.2 - 5.8 范围之外的 Unreal Engine 版本,请通过 support@bhaptics.com 联系我们。
在独立 VR 头显上未在头显上安装 bHaptics VR Player 的情况下使用 bHaptics 触觉设备已被弃用。请在头显上安装 bHaptics VR Player 以使用触觉设备。
如果您正在为 macOS 进行开发,请查看macOS 网络 Entitlement章节,以确保您打包后的应用能够连接到 bHaptics Player。
About haptic application
You can create and manage haptic apps in Developer Portal, a web-based tool.
If you're unfamiliar with haptic apps or haven't created one yet, please follow the Portal guide before proceeding.
Before linking a haptic app to your game project, make sure the haptic app meets the following requirements:
- At least one haptic event must be created.
- API Key must be generated.
- There is no API Key by default. To generate one, go to the "API Key" tab and click "New" button.
- Haptic app must be deployed
- If you see "Deploy Now" button in the upper right corner, click it to deploy your haptic app. Otherwise, if you can see "Up to date", it means that the latest haptic app has already been deployed.
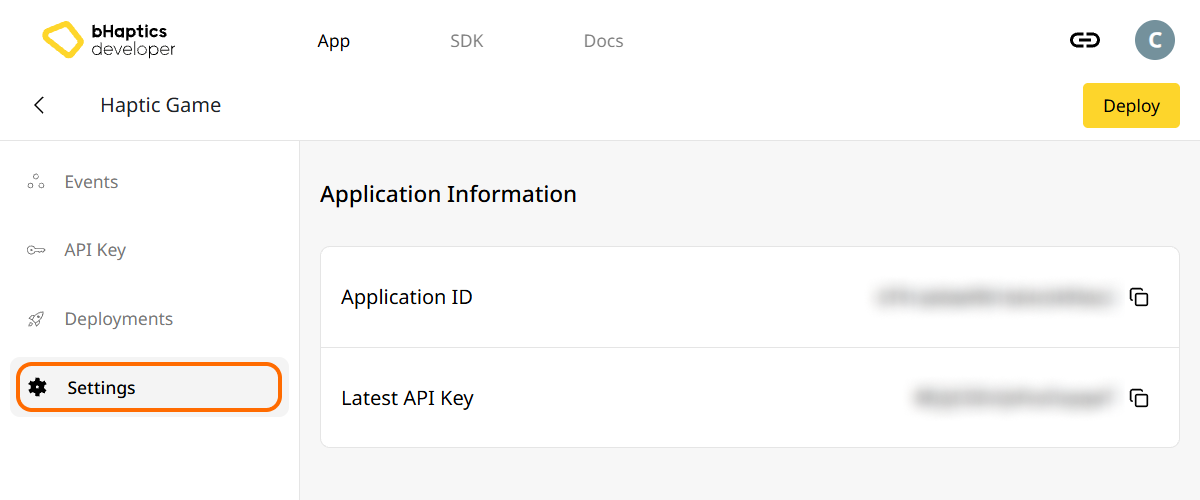
Also, link process requires App ID and API Key. Go to the "Settings" tab, and check the App ID and API Key.
导入 SDK 插件
将 SDK 插件导入 Unreal 项目有两种方式:Engine Plugin 和 Game Plugin。
我应该使用哪一种?
两种类型的插件都能提供相似的功能,但它们的安装位置和适用范围不同。
- Engine Plugin: 安装在引擎目录中,使其可供所有使用该 UE 版本的项目使用。
- 安装位置:
[Unreal Engine Root Directory]/Engine/Plugins/[Plugin Name]/
- 安装位置:
- Game Plugin: 放置在您的项目文件夹内,仅供特定项目使用。
- 安装位置:
[Project Root Directory]/Plugins/[Plugin Name]/
- 安装位置:
您从 Fab 下载的插件是 engine plugin —— 一个预编译的 Windows 二进制文件。它不包含 macOS 或主机二进制文件,因此无法在 macOS 上使用,也无法为 PS5 等主机打包。
对于 macOS 或主机开发,请使用 game plugin。 SDK 本身是平台中立的 —— 它通过本地网络连接与 bHaptics Player 通信 —— 因此其源代码可针对任何目标平台进行编译。game plugin 将该源代码放置在您的项目内,从而使其与您的项目一起针对目标平台(包括 macOS 和 PS5)进行构建。在项目中捆绑插件源代码也符合主机认证要求。如果您无法使用 Fab,game plugin 同样很有用。
更多信息请参考官方 Unreal 文档。
安装插件
- Engine Plugin (UE 5.2 - 5.8)
- Game Plugin (UE 5.2 - 5.8)
Fab engine plugin 是一个预编译的 Windows 二进制文件。对于 macOS,请改用 Game Plugin。
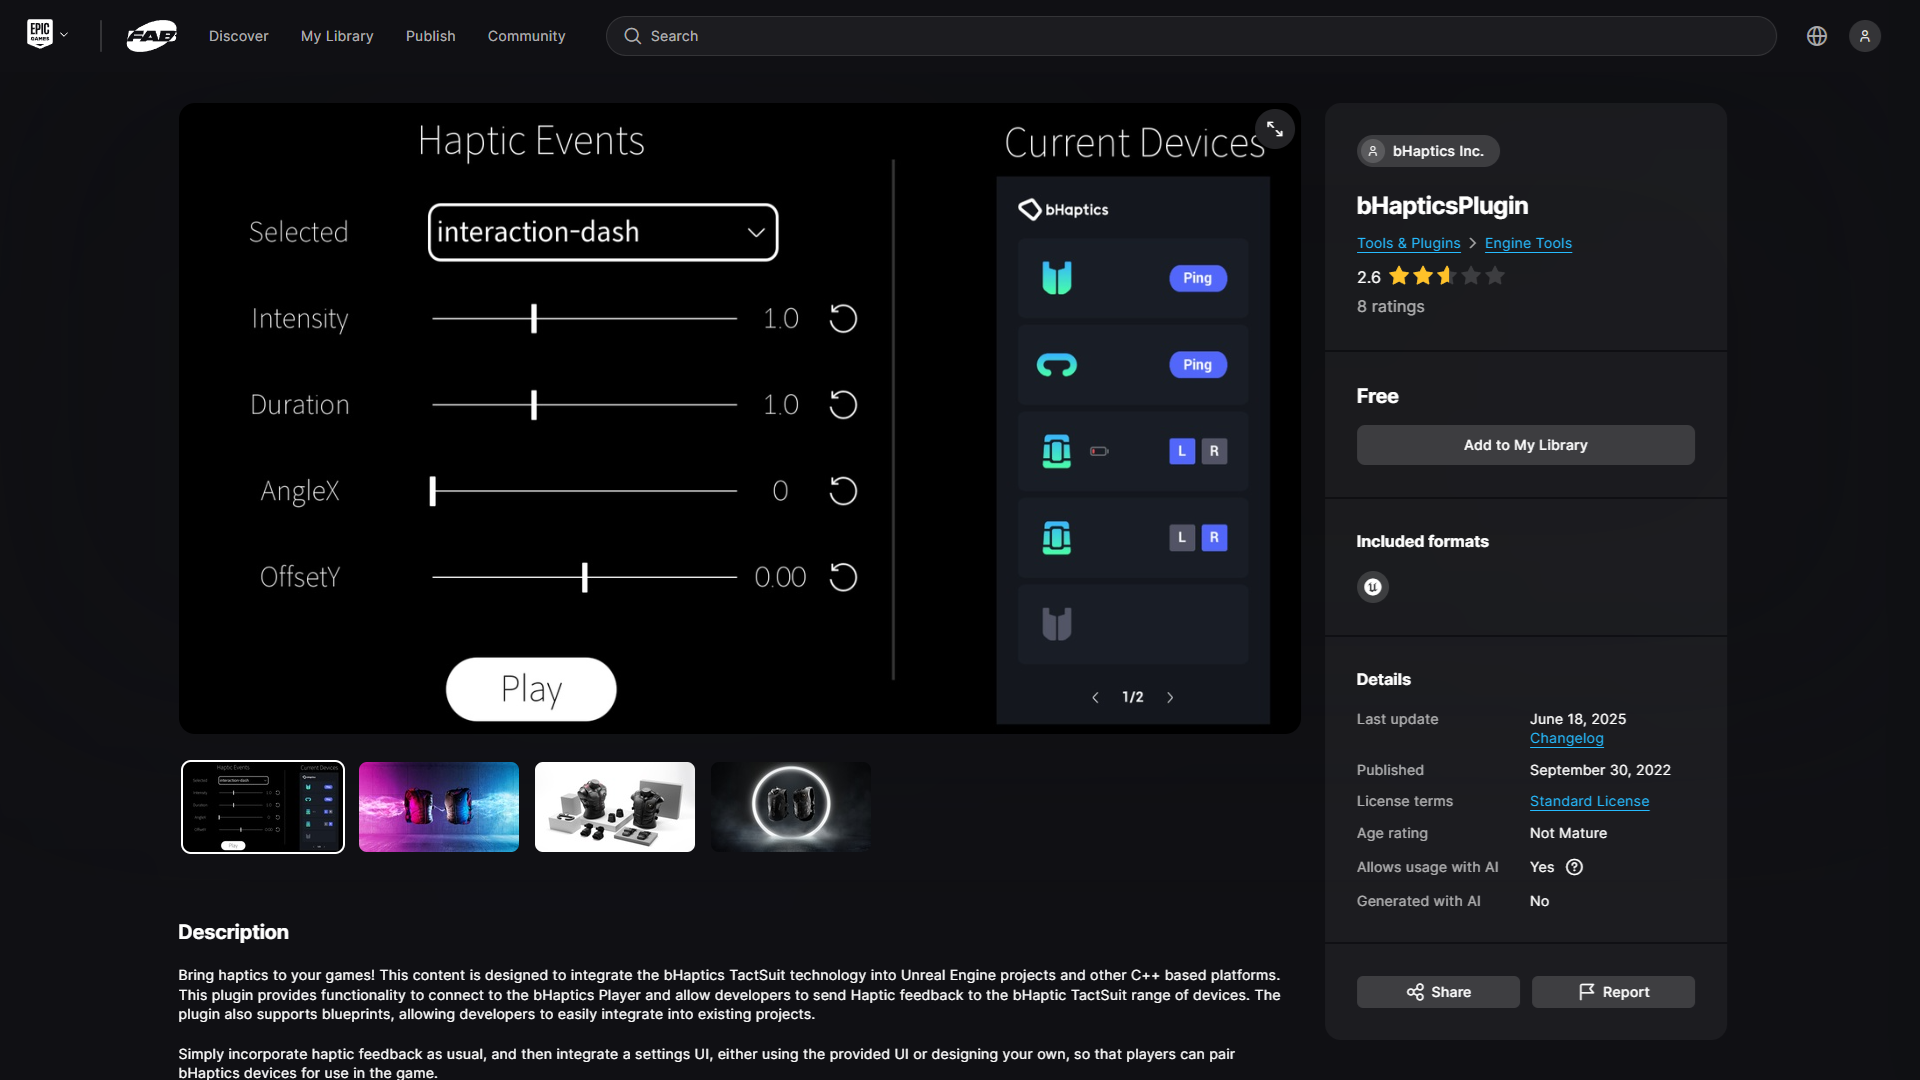
- 从 Fab 获取 bHaptics Plugin。
- 前往 Epic Games Launcher 将插件安装到引擎。
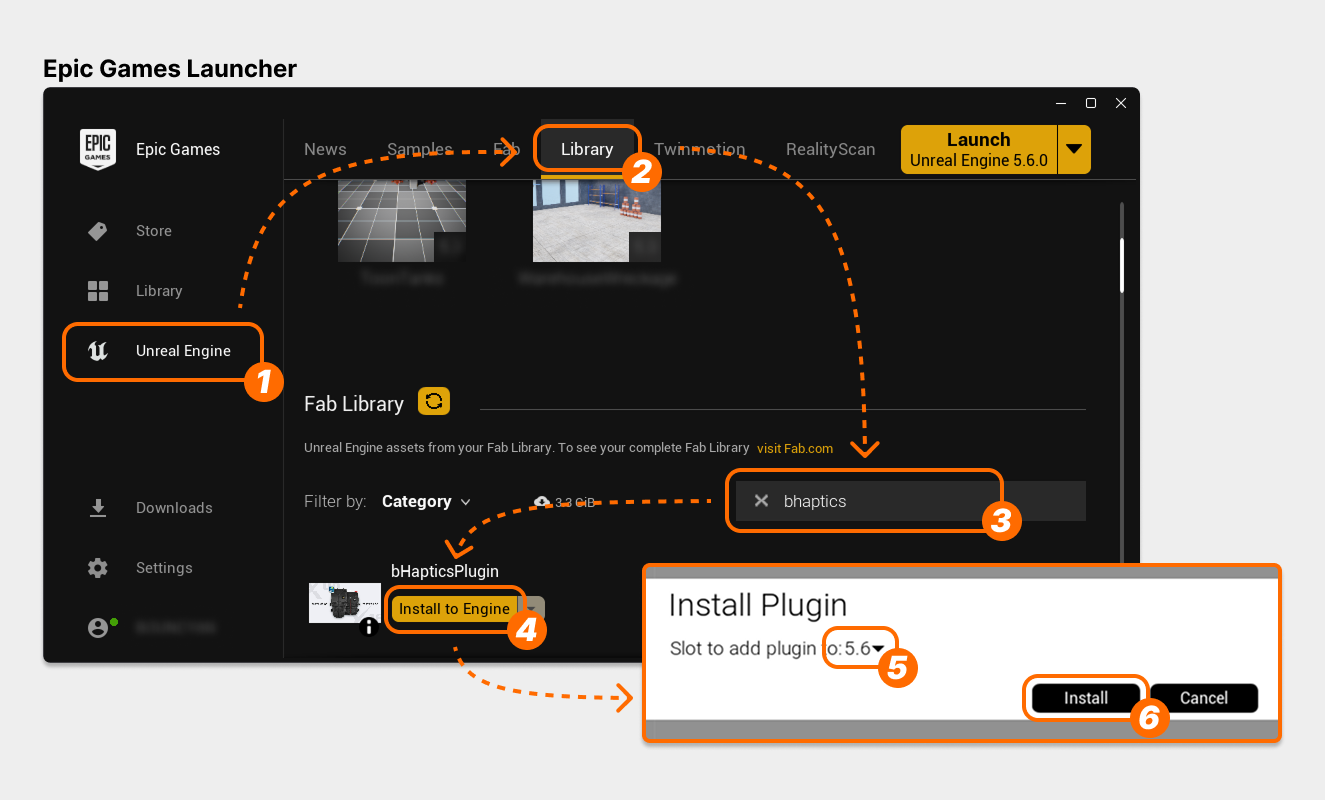
- 在左侧,选择 "Unreal Engine" 选项卡。
- 在顶部,选择 "Library" 选项卡。
- 向下滚动到 "Fab Library",并搜索 "bhaptics"。
- 找到 "bHapticsPlugin",并选择 "Install to Engine"。
- 选择您想要使用的游戏引擎版本。
- 选择 "Install"。下载将立即开始。
- 打开 Unreal 项目并前往 Plugins 窗口。
- 激活插件。
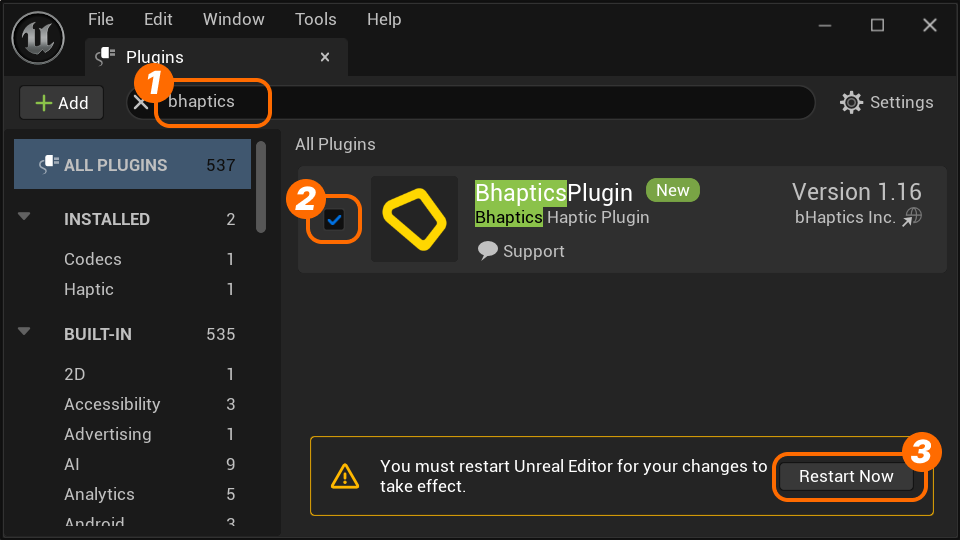
- 搜索 "bhaptics"。
- 勾选 "BhapticsPlugin" 以激活。
- 将会出现警告。按 "Restart Now"。(如果有任何更改,请确保先保存您的项目!)
- 重启编辑器后,再次打开 Plugins 窗口,确认 "BhapticsPlugin" 已启用。
开始前请备份您的项目。
如果您之前从 Fab 安装了 engine plugin,请在继续之前移除该 engine plugin。
此处假定您的 Unreal 项目使用 C++。如果项目仅使用 Blueprint,则必须先创建一个 C++ 类并构建您的项目,然后再按照以下说明操作。
- 下载 bHaptics Plugin,压缩的插件文件将立即下载。
- 解压下载的 zip 文件。将创建一个名为
BhapticsPlugin[_VERSION]的文件夹。 - 前往您的 Unreal 项目目录。然后,将
BhapticsPlugin[_VERSION]文件夹放置在 Unreal 项目的Plugins文件夹中。路径应为[YourUEProjectName]/Plugins/BhapticsPlugin。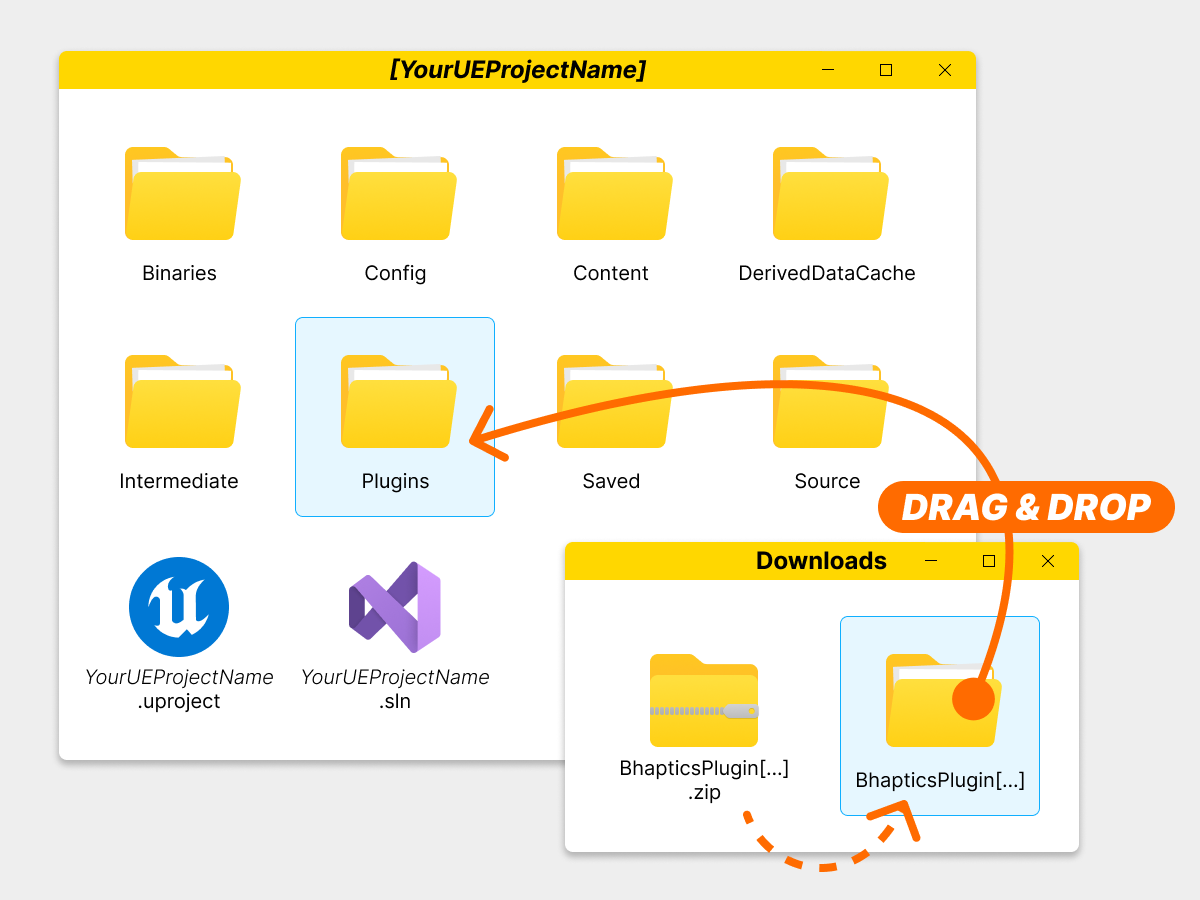
- 如果项目中不存在
Plugins文件夹,请创建一个新文件夹。 - 这些文件的位置不能更改,因此请确保它们放置正确。文件夹应位于如下位置。
[YourUEProjectName]├── Binaries├── Config├── Plugins│ └── BhapticsPlugin_VERSION│ ├── BhapticsPlugin.uplugin│ └── (...)├── (...)├── [YourUEProjectName].sln└── [YourUEProjectName].uproject
- 如果项目中不存在
- 右键单击
[YourUEProjectName].uproject文件并选择 "Generate Visual Studio project files" 以重新生成[YourUEProjectName].sln文件。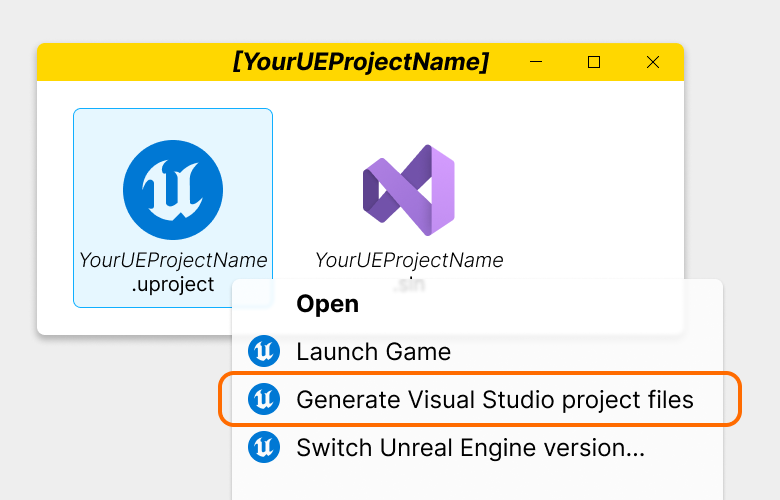
- 打开
[YourUEProjectName].sln,在 Solution Explorer 中右键单击项目名称,然后选择 "Build" 以编译项目源代码。
- 打开您的 Unreal 项目,并前往 Plugin 设置。确认 Haptic 部分中的 "BhapticsPlugin" 已启用。
连接触觉应用
- 打开 Project Settings。
- 前往 bHaptics 插件设置。
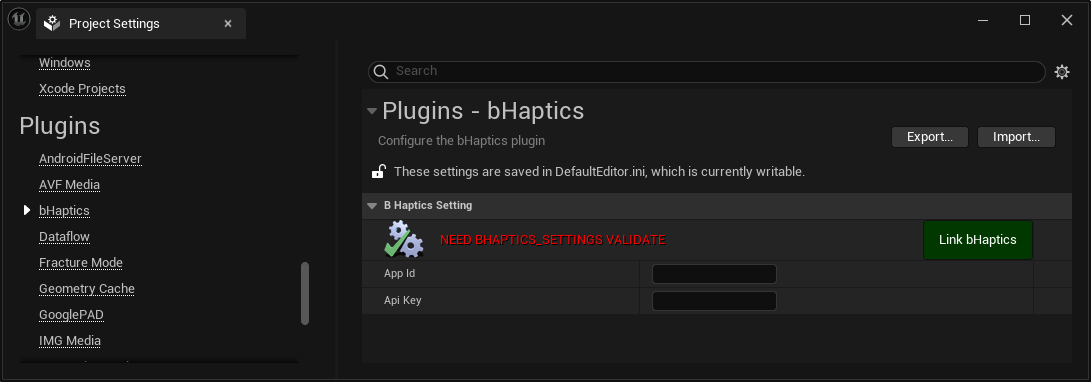
- 输入触觉应用的 App ID、API Key,然后按 "Link bHaptics" 按钮。App ID 和 API Key 可在 Portal 中找到。
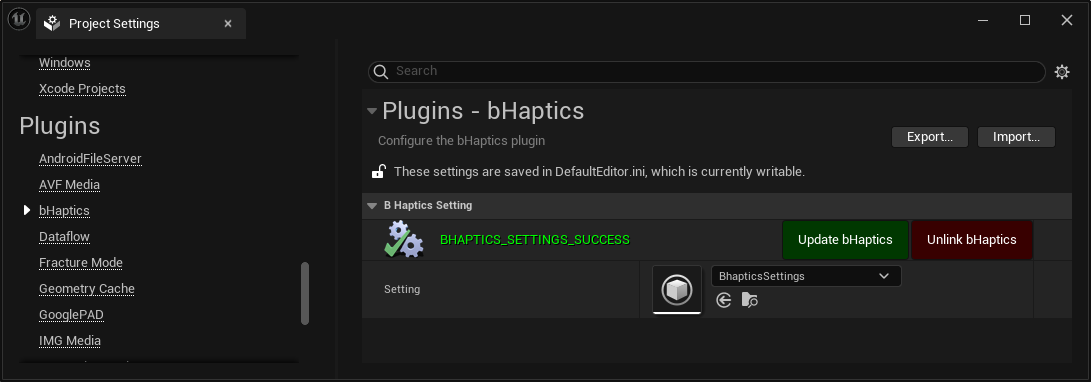
- 如果项目与 bHaptics Developer Portal 成功同步,您将收到以下消息 BHAPTICS_SETTINGS_SUCCESS。
设置触觉环境
在使用触觉相关函数之前,您必须设置触觉环境。有两个必须使用的主要函数:Initialize 和 Destroy。
您应当在游戏开始时初始化触觉环境。同时也应当在游戏结束时销毁它。
这些函数同时提供了 Blueprint 和 C++ 两种方式。
- Blueprint
- Initialize: 调用 "Initialize bHaptics" 节点
- Destroy: 调用 "Destroy bHaptics" 节点
- C++
- Initialize: 调用
UBhapticsSDK2::Initialize()函数 - Destroy: 调用
UBhapticsSDK2::Destroy()函数
- Initialize: 调用
此外,您还必须注意:
- 您可以多次初始化。这不会造成任何效率问题。
- 您必须在程序结束的最后一个关卡中调用 DESTROY,并且必须仅调用一次。如果不调用 Destroy 或调用多次,可能会导致崩溃。
常见设置方法
设置触觉环境有两种常见方式。请根据您的项目结构和需求选择其中一种。
- 通过 GameInstance(推荐)
- 通过 Level Blueprint
- 通过 GameInstance
- 通过 Level Blueprint
game instance 在引擎启动时实例化,并保持活动状态直到引擎关闭。
"Gameplay Framework" — Unreal 文档
- 创建一个继承自 "GameInstance" 的新 Blueprint Class。
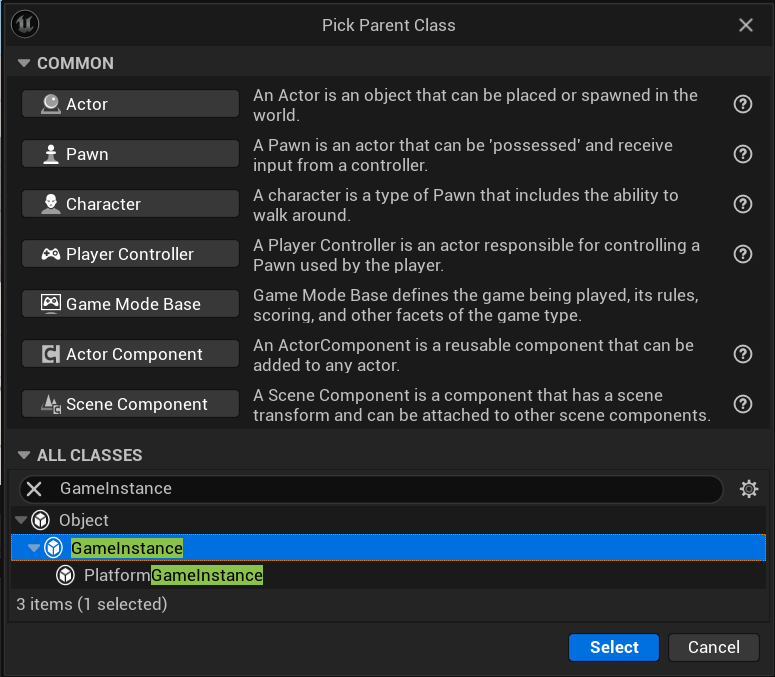
- 为其命名,并打开其 Event Graph。

- 设置 Event Graph,然后编译/保存。
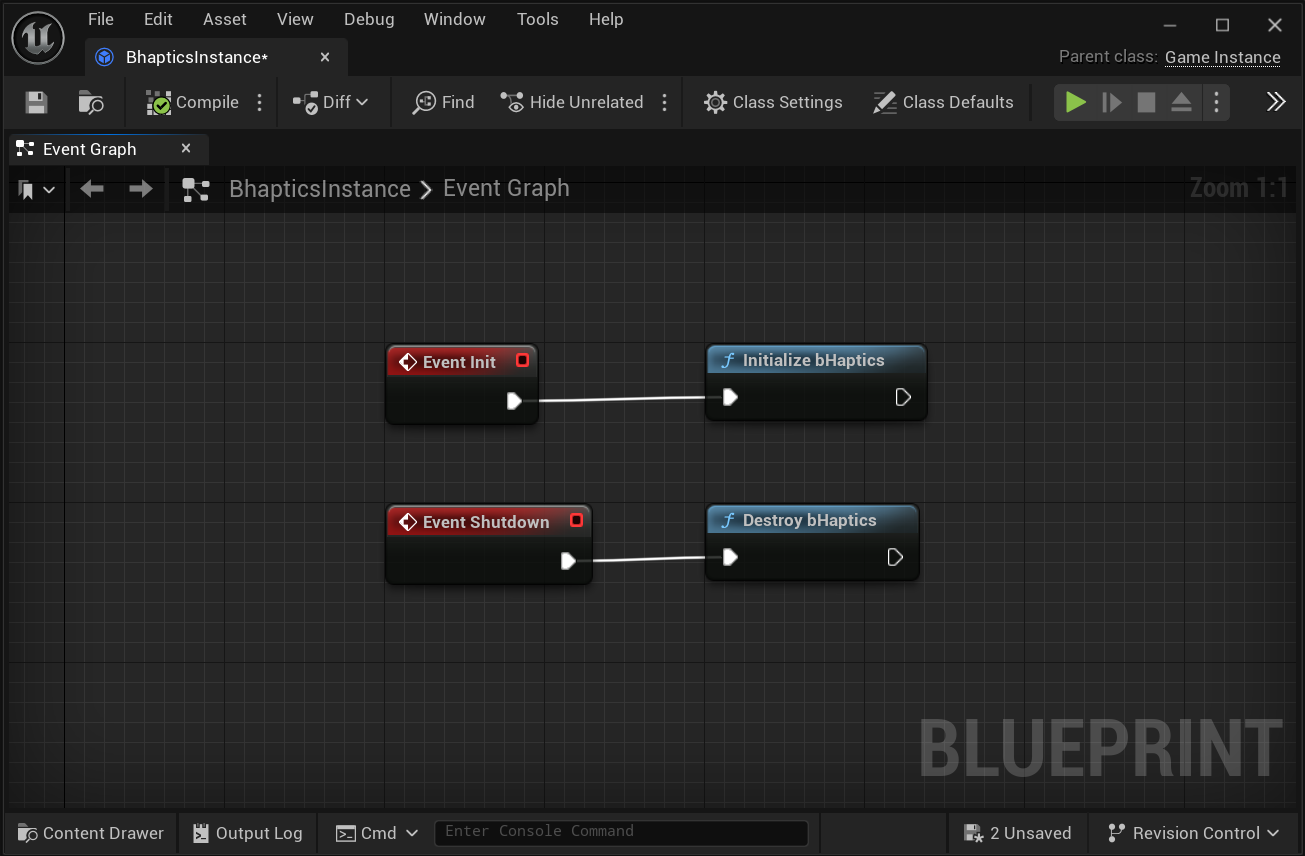
- Initialize: 在 "Event Init" 之后连接 "Initialize bHaptics"。
- Destroy: 在 "Event Shutdown" 之后连接 "Destroy bHaptics"。
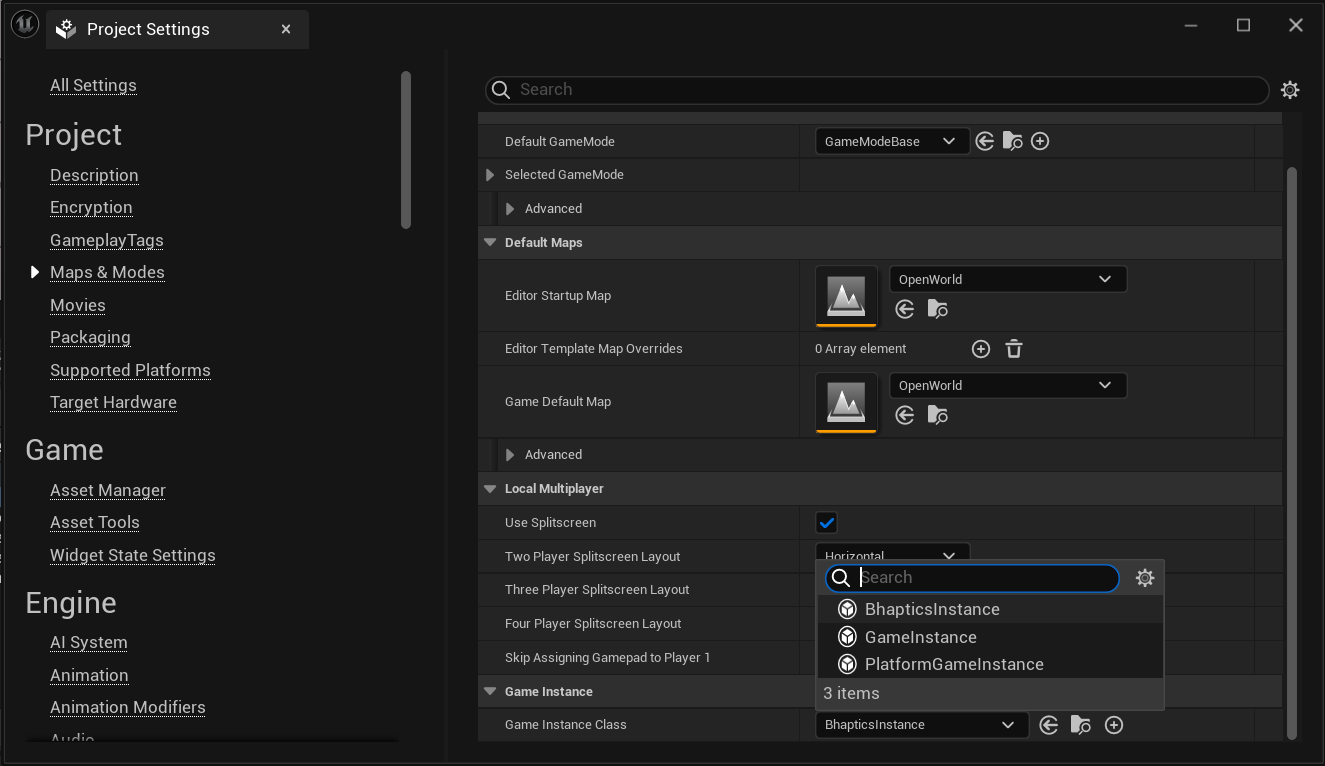
- 前往 Project Settings → Project → Maps & Modes,将 Game Instance Class 设置为您刚刚创建的类。
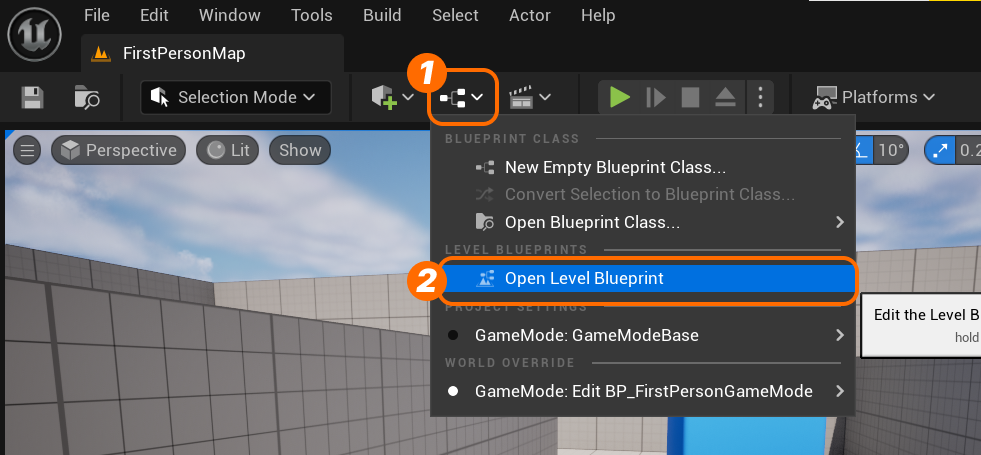
- 打开 Level Blueprint。
- 设置 Event Graph,然后编译/保存。

- Initialize: 在 "Event BeginPlay" 之后连接 "Initialize bHaptics"。
- Destroy: 在 "Event End Play" 之后连接 "Destroy bHaptics"。
(可选)为 C++ 做准备
如果您在 Unreal 项目中使用 C++,则需要一些额外的必要步骤。
- 移动到
Source/[YourGameName]/[YourGameName].Build.cs并添加依赖项。Source/[YourGameName]/[YourGameName].Build.cs// Add DependencyPrivateDependencyModuleNames.Add("BhapticsPlugin");// Or Using AddRangePrivateDependencyModuleNames.AddRange(new string[] { "BhapticsPlugin" });备注修改
Build.cs文件后,您必须重新生成项目文件,并重新构建引擎。- 重新生成项目文件:在文件资源管理器中前往您的 Unreal 项目,右键单击
[YourUEProjectName].uproject文件,然后选择 "Generate Visual Studio Project Files"。 - 重新构建引擎:打开
[YourUEProjectName].sln,在 Solution Explorer 中右键单击项目名称,然后选择 "Rebuild"。
- 重新生成项目文件:在文件资源管理器中前往您的 Unreal 项目,右键单击
- 在使用触觉功能的 C++ 脚本中包含
"BhapticsSDK2.h"头文件。#include "CppGameModeBase.h"#include "BhapticsSDK2.h"void CppGameModeBase::BeginPlay(){Super::BeginPlay();UBhapticsSDK2::Initialize();}
macOS 网络 Entitlement
在 macOS 15 (Sequoia) 及更高版本上,打包后的应用运行在 App Sandbox 内。除非应用声明网络客户端 entitlement,否则沙盒会阻止所有网络访问(包括对 localhost 的连接)。由于 SDK 通过本地连接与 bHaptics Player 通信,因此没有此 entitlement 的 macOS 打包构建无法连接到 Player(您可能会看到它因 sandbox deny network 错误而失败)。
当您为 macOS 打包应用时,请添加 com.apple.security.network.client entitlement。这由应用开发者配置,不属于 SDK 的一部分。
延伸阅读
现在您已经准备好使用 bHaptics 触觉功能了!要在游戏中播放触觉,请访问我们的 Unreal 参考。