Guide for Unreal
Using our Unreal SDK Plugin, you can implement the haptic into your content made with Unreal.
- Import SDK Plugin
- Link the Haptic App
- Set Up Haptic Environment
- (Optional) Prepare for C++
Requirements
- Development Environment
- OS: Windows 10/11 (x64), macOS (Apple Silicon) (currently on Beta)
- Unreal Engine 5.2 - 5.8
- bHaptics Player installed
- Deployed haptic application corresponding to your game
- App ID and API Key of the haptic app
- Runtime Environment
- OS: Windows 10/11 (x64), Android (VR headsets only), PS5
- Supported headsets: Meta Quest 2/3/3S/Pro, Pico 4/4 Pro/4 Ultra, HTC VIVE Focus 3/Focus Vision/XR Elite
- The bHaptics VR Player must be installed on the headset.
- OS: Windows 10/11 (x64), Android (VR headsets only), PS5
If you need support for an Unreal Engine version outside the 5.2 - 5.8 range, contact us at support@bhaptics.com.
Using bHaptics haptic devices on a standalone VR headset without the bHaptics VR Player installed on the headset is deprecated. Install the bHaptics VR Player on the headset to use haptic devices.
If you are developing for macOS, please check the macOS Network Entitlement section to ensure your packaged app can connect to bHaptics Player.
About haptic application
You can create and manage haptic apps in Developer Portal, a web-based tool.
If you're unfamiliar with haptic apps or haven't created one yet, please follow the Portal guide before proceeding.
Before linking a haptic app to your game project, make sure the haptic app meets the following requirements:
- At least one haptic event must be created.
- API Key must be generated.
- There is no API Key by default. To generate one, go to the "API Key" tab and click "New" button.
- Haptic app must be deployed
- If you see "Deploy Now" button in the upper right corner, click it to deploy your haptic app. Otherwise, if you can see "Up to date", it means that the latest haptic app has already been deployed.
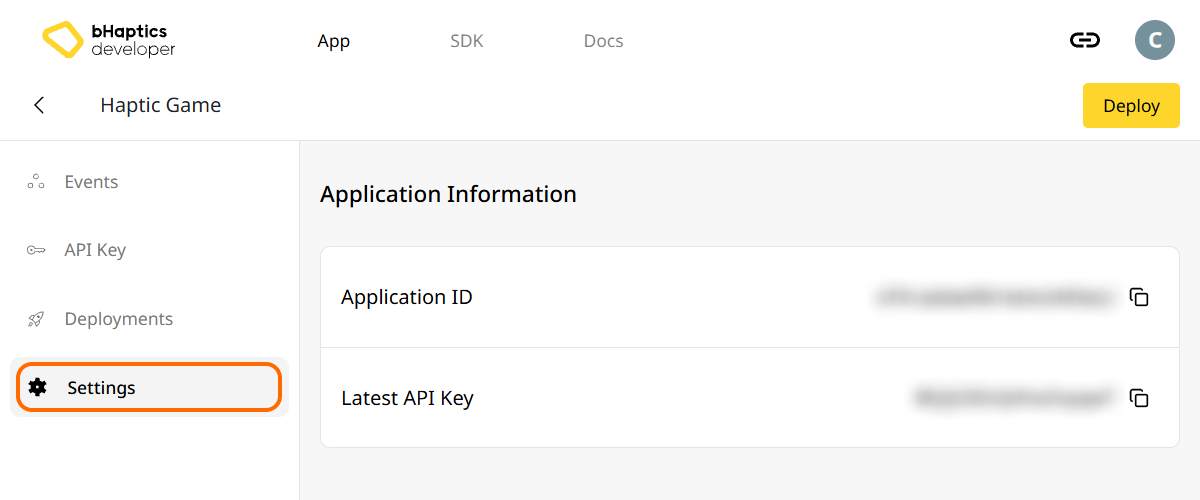
Also, link process requires App ID and API Key. Go to the "Settings" tab, and check the App ID and API Key.
Import SDK Plugin
There are two ways to import the SDK plugin into your Unreal project: Engine Plugin, and Game Plugin
Which one should I use?
Both types of plugins can provide similar functionality, but their installation location and scope are different.
- Engine Plugin: Installed in the engine directory, making it available to all projects that use the installed version of UE.
- Installed at
[Unreal Engine Root Directory]/Engine/Plugins/[Plugin Name]/
- Installed at
- Game Plugin: Placed inside your project's folder, making it available only to a specific project.
- Installed at
[Project Root Directory]/Plugins/[Plugin Name]/
- Installed at
The plugin you download from Fab is an engine plugin — a precompiled Windows binary. It does not include macOS or console binaries, so it cannot be used on macOS or packaged for consoles such as PS5.
For macOS or console development, use a game plugin. The SDK itself is platform-neutral — it talks to bHaptics Player over a local network connection — so its source compiles for any target platform. A game plugin places that source inside your project, so it is built together with your project for your target platform, including macOS and PS5. Bundling the plugin source in your project also aligns with console certification requirements. A game plugin is also useful if you can't use Fab.
For more information, refer to the official Unreal Documentation.
Install the Plugin
- Engine Plugin (UE 5.2 - 5.8)
- Game Plugin (UE 5.2 - 5.8)
The Fab engine plugin is a precompiled Windows binary. For macOS, use the Game Plugin instead.
- Get bHaptics Plugin from Fab.

- Go to Epic Games Launcher to install plugin to engine.
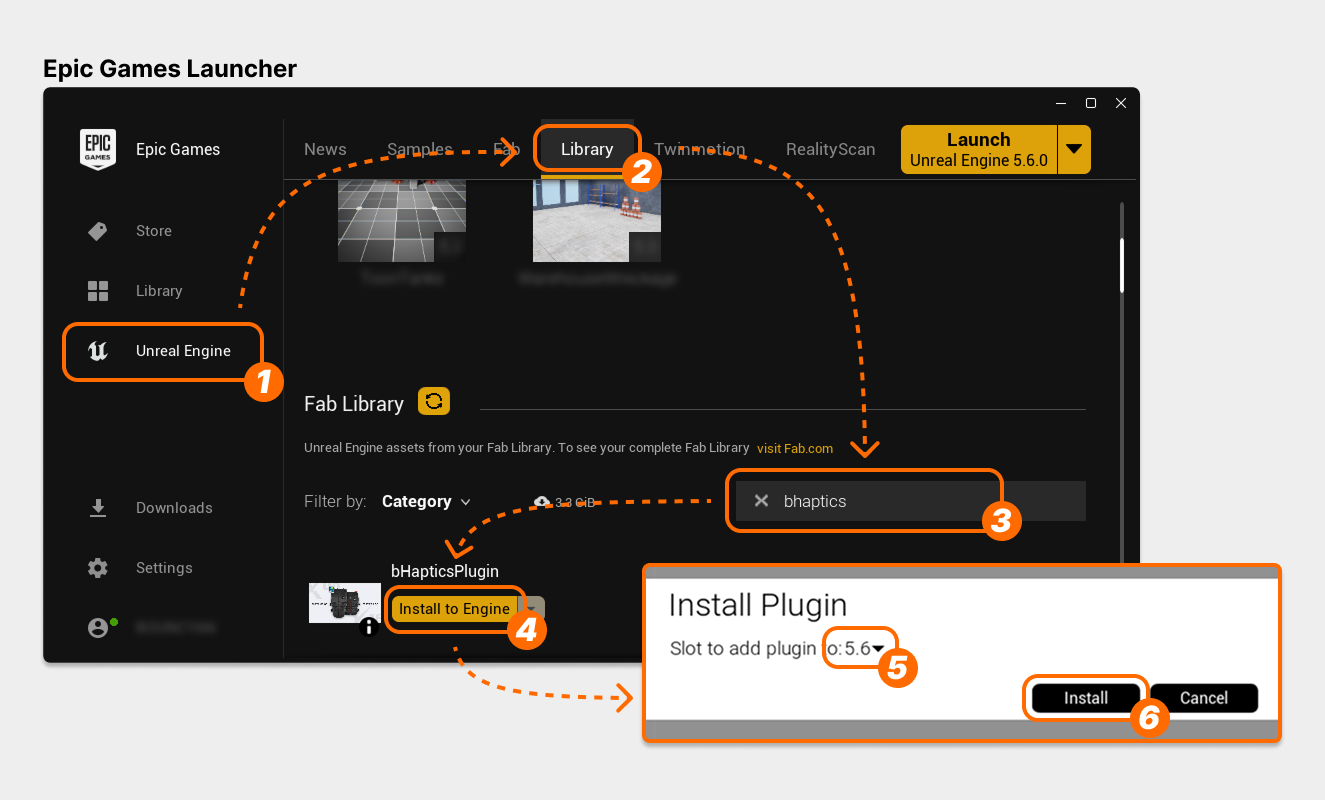
- At the left, Select "Unreal Engine" tab.
- At the top, Select "Library" tab.
- Scroll down to "Fab Library", and search "bhaptics".
- Find "bHapticsPlugin", and select "Install to Engine".
- Select your game engine version you want to use.
- Select "Install". The download will begin immediately.
- Open the Unreal Project and go to the Plugins window.
- Activate the plugin.
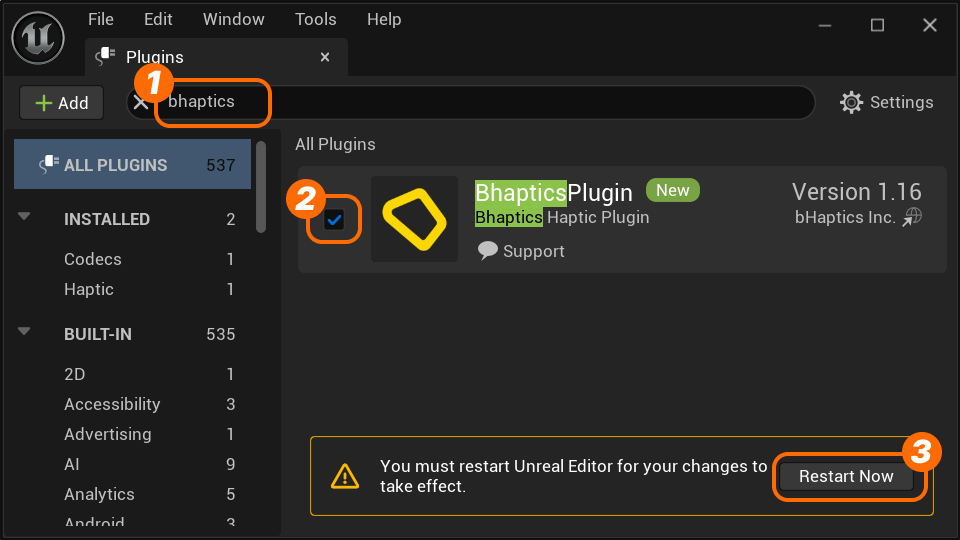
- Search "bhaptics".
- Check "BhapticsPlugin" to activate.
- The warning will appear. Press "Restart Now". (Make sure you save your project first if you have any changes!)
- After restarting the editor, open the Plugins window again, and check that "BhapticsPlugin" is enabled.
Back up your project before you start.
If you previously installed the engine plugin from Fab, remove the engine plugin before proceeding.
It assumes that your Unreal project is using C++. If the project only uses Blueprints, you must create a C++ class and build your project before following these instructions.
- Download the bHaptics Plugin, The zipped plugin files will download immediately.
- Unzip the downloaded zip files. The folder named
BhapticsPlugin[_VERSION]will be created. - Go to the directory of your Unreal project. Then, place the
BhapticsPlugin[_VERSION]folder in thePluginsfolder of your Unreal project. The path should be[YourUEProjectName]/Plugins/BhapticsPlugin.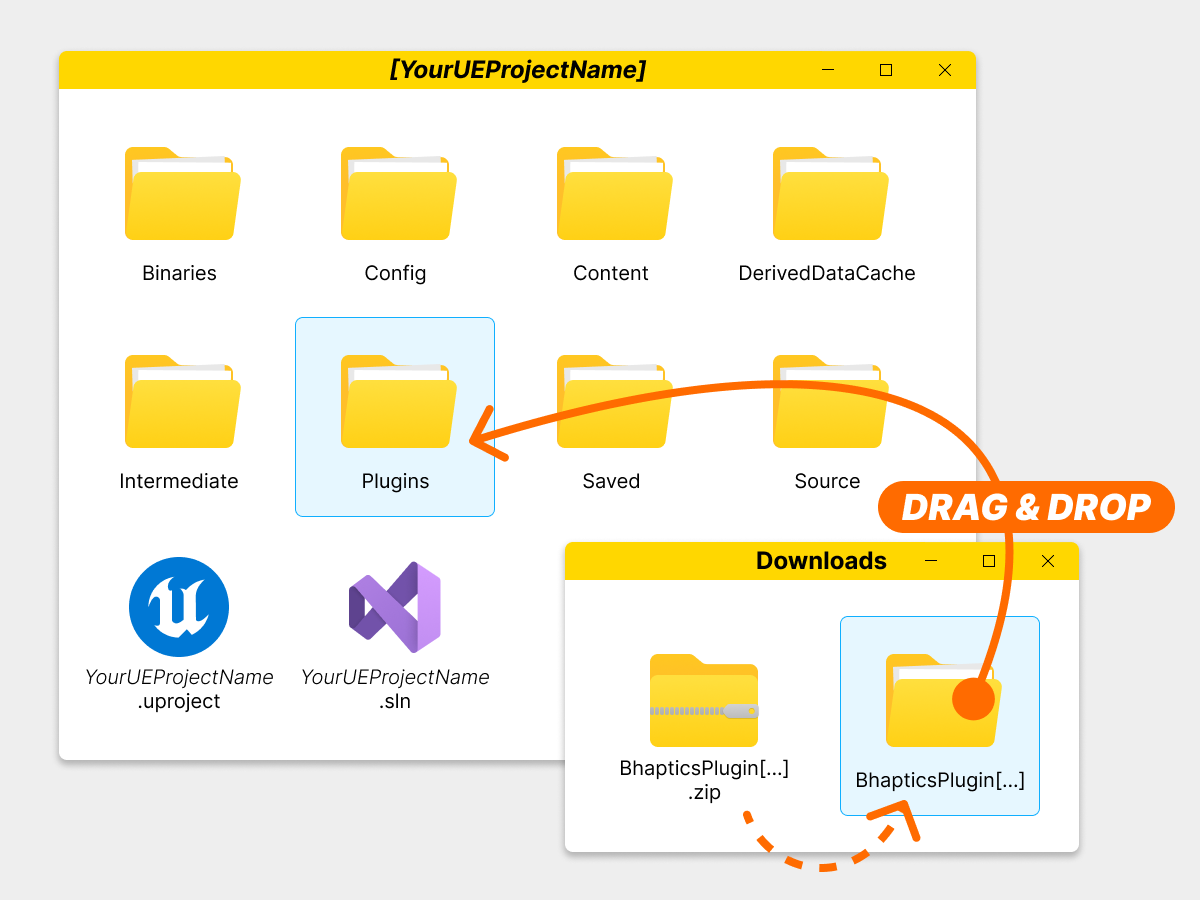
- If the
Pluginsfolder doesn't exist in your project, create a new one. - The location of these files must not be changed, so ensure they are placed correctly. The folder should be located as follows.
[YourUEProjectName]├── Binaries├── Config├── Plugins│ └── BhapticsPlugin_VERSION│ ├── BhapticsPlugin.uplugin│ └── (...)├── (...)├── [YourUEProjectName].sln└── [YourUEProjectName].uproject
- If the
- Right-click the
[YourUEProjectName].uprojectfile and select "Generate Visual Studio project files" to regenerate the[YourUEProjectName].slnfile.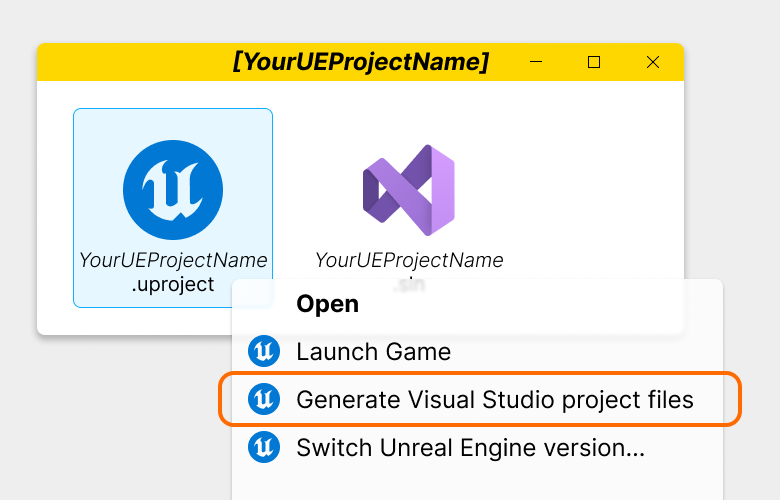
- Open
[YourUEProjectName].sln, right-click the project name in the Solution Explorer, and select "Build" to compile the project source.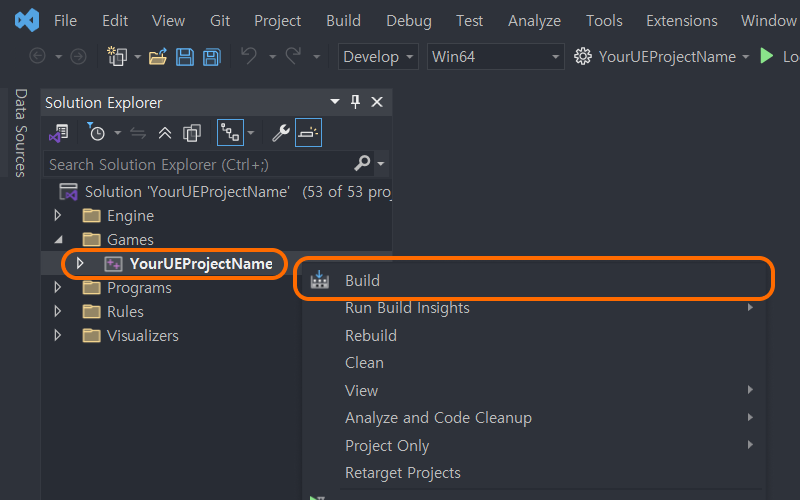
- Open your Unreal project, and go to Plugin settings. Check that "BhapticsPlugin" in Haptic section is enabled.
Link the Haptic App
- Open the Project Settings.
- Go to bHaptics plugin settings.
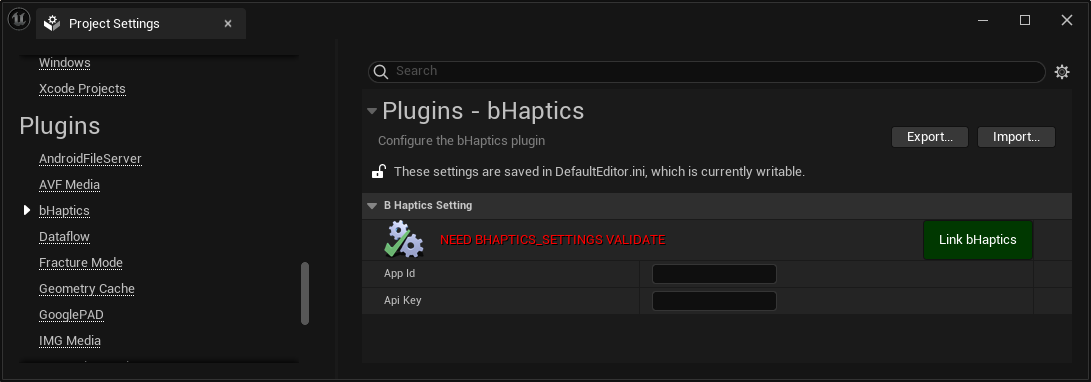
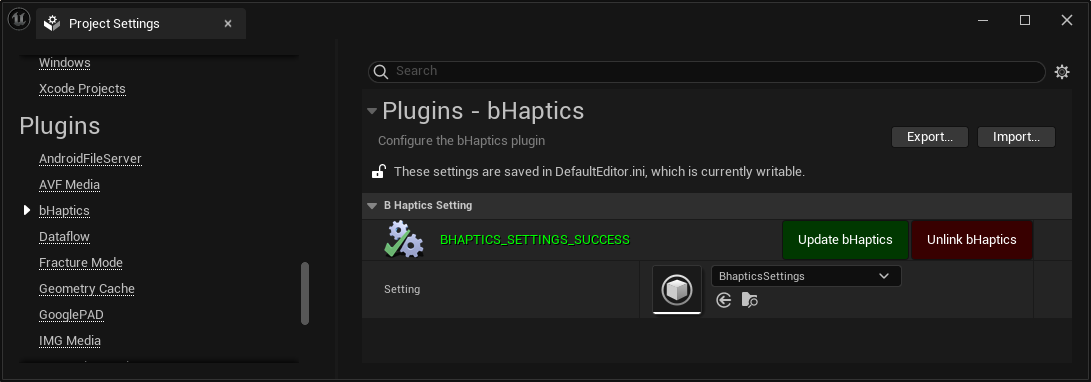
- Put the App ID, API Key of your haptic app, and press "Link bHaptics" button. App ID and API key can be found in Portal.
- If the project is successfully synchronized with bHaptics Developer portal, you will receive following message BHAPTICS_SETTINGS_SUCCESS.
Set Up Haptic Environment
Before using haptic-related functions, you must set up the haptic environment. There are two main functions you must use: Initialize and Destroy.
You should initialize the haptic environment at the beginning of the game. You should also destroy it when the game ends.
Both Blueprint and C++ methods are provided for these functions.
- Blueprint
- Initialize: Call "Initialize bHaptics" Node
- Destroy: Call "Destroy bHaptics" Node
- C++
- Initialize: Invoke
UBhapticsSDK2::Initialize()Function - Destroy: Invoke
UBhapticsSDK2::Destroy()Function
- Initialize: Invoke
Also, you must notice that:
- You can initialize multiple times. This will not cause any efficiency problems.
- You MUST DESTROY at the last level where the program ends, and you must do it ONLY ONCE. It can cause crashes if you don't destroy or destroy more than once.
Common Setup Practices
There are two common ways to set up the haptic environment. Choose either one based on your project structure and needs.
- Via GameInstance (Recommended)
- Via Level Blueprint
- Via GameInstance
- Via Level Blueprint
The game instance is instantiated on engine launch and remains active until the engine shuts down.
"Gameplay Framework" — Unreal Documentation
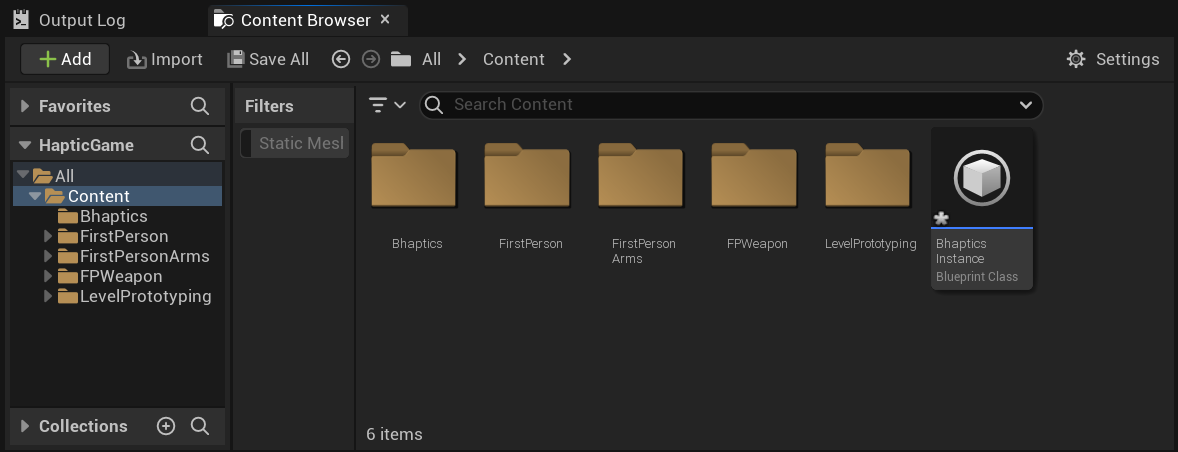
- Create new Blueprint Class inherit from "GameInstance".
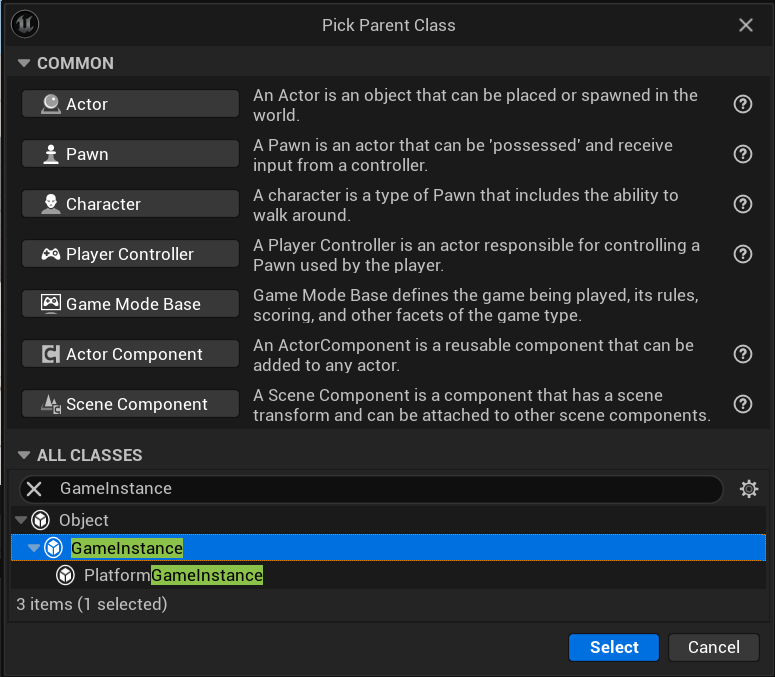
- Name it as you want, and open its Event Graph.
- Setup the Event Graph, and compile/save.
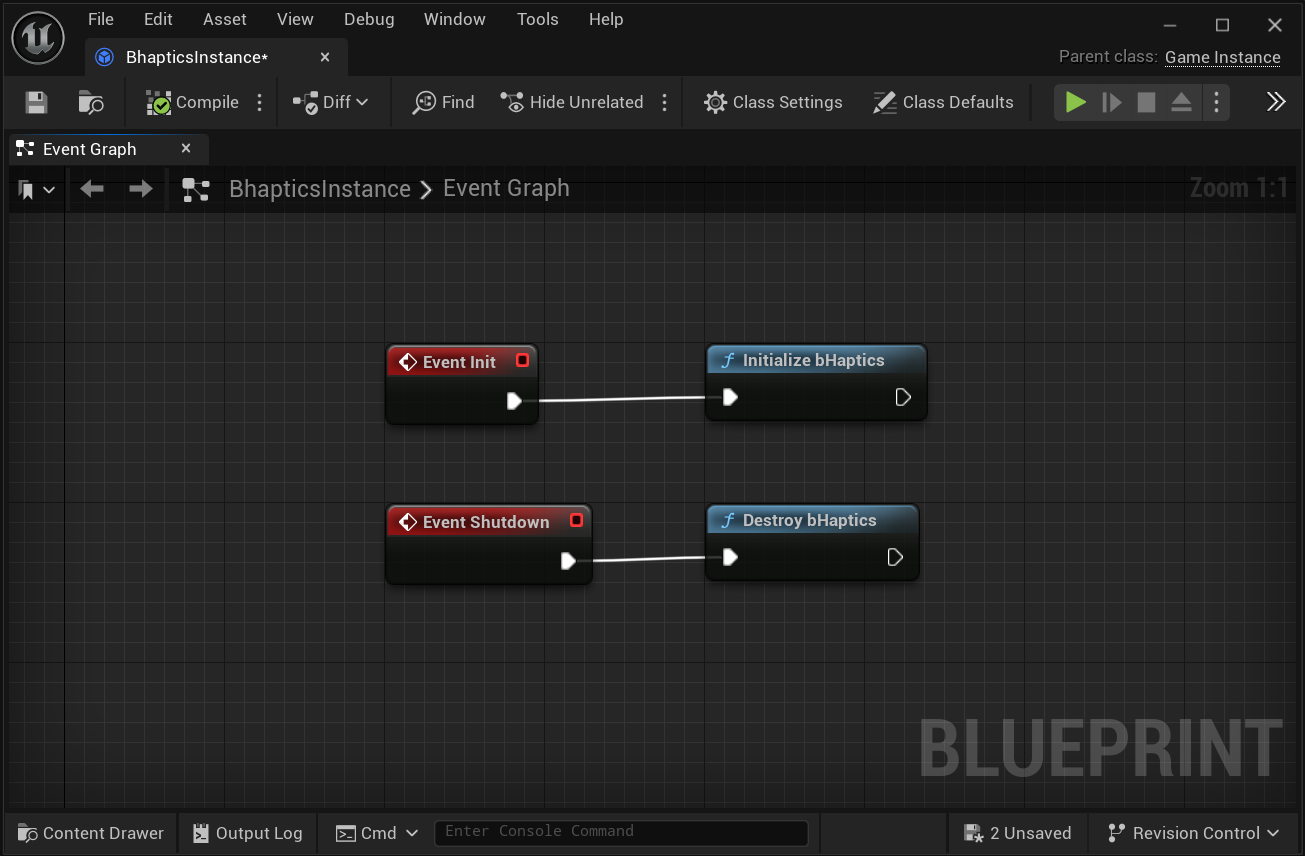
- Initialize: Connect "Initialize bHaptics" after "Event Init".
- Destroy: Connect "Destroy bHaptics" after "Event Shutdown".
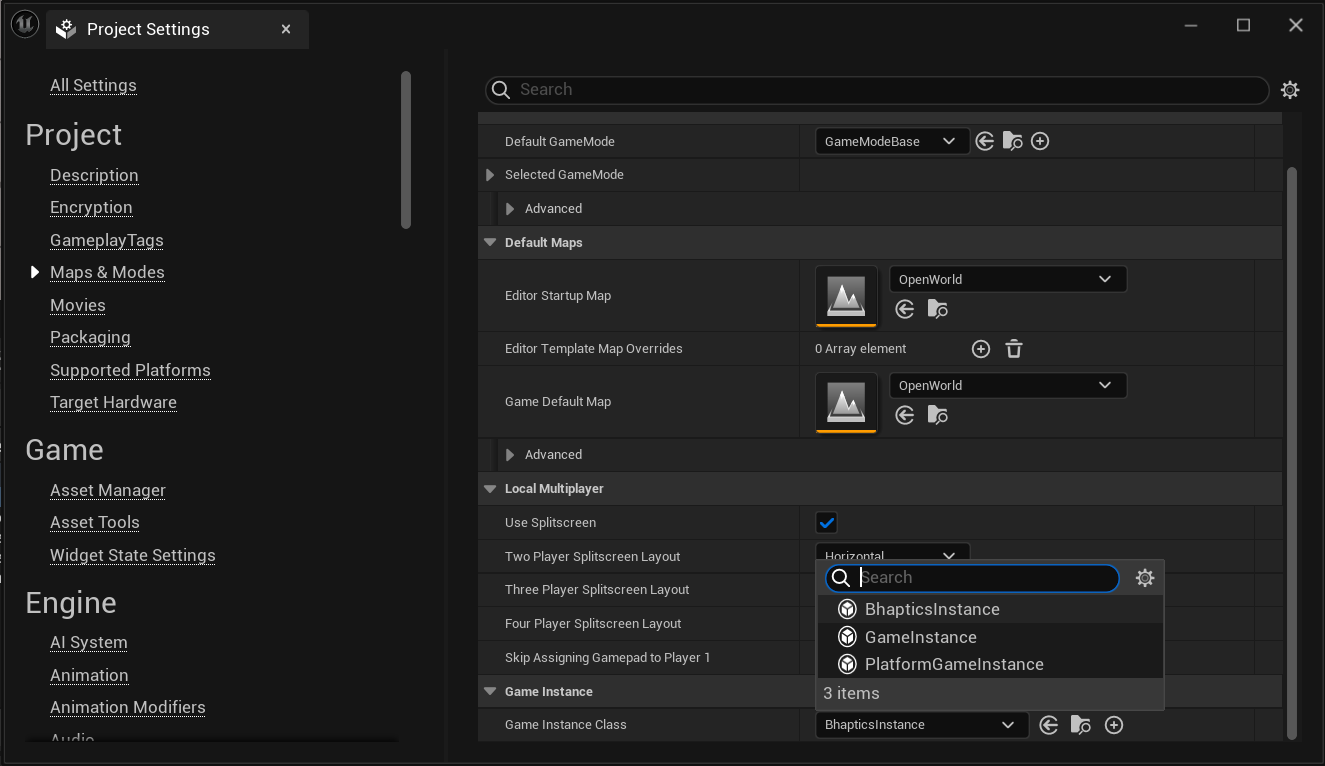
- Go to Project Settings → Project → Maps & Modes, and set Game Instance Class as what you've just made.
- Open the Level Blueprint.
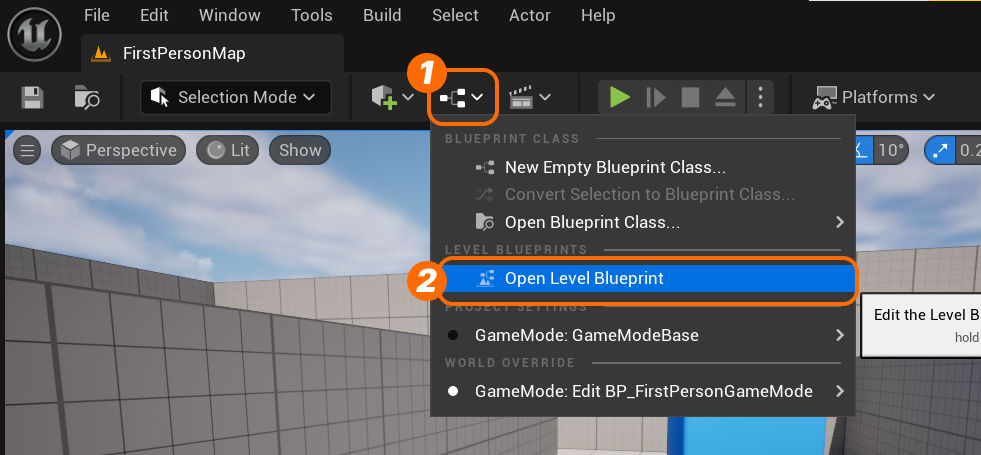
- Setup the Event Graph, and compile/save.
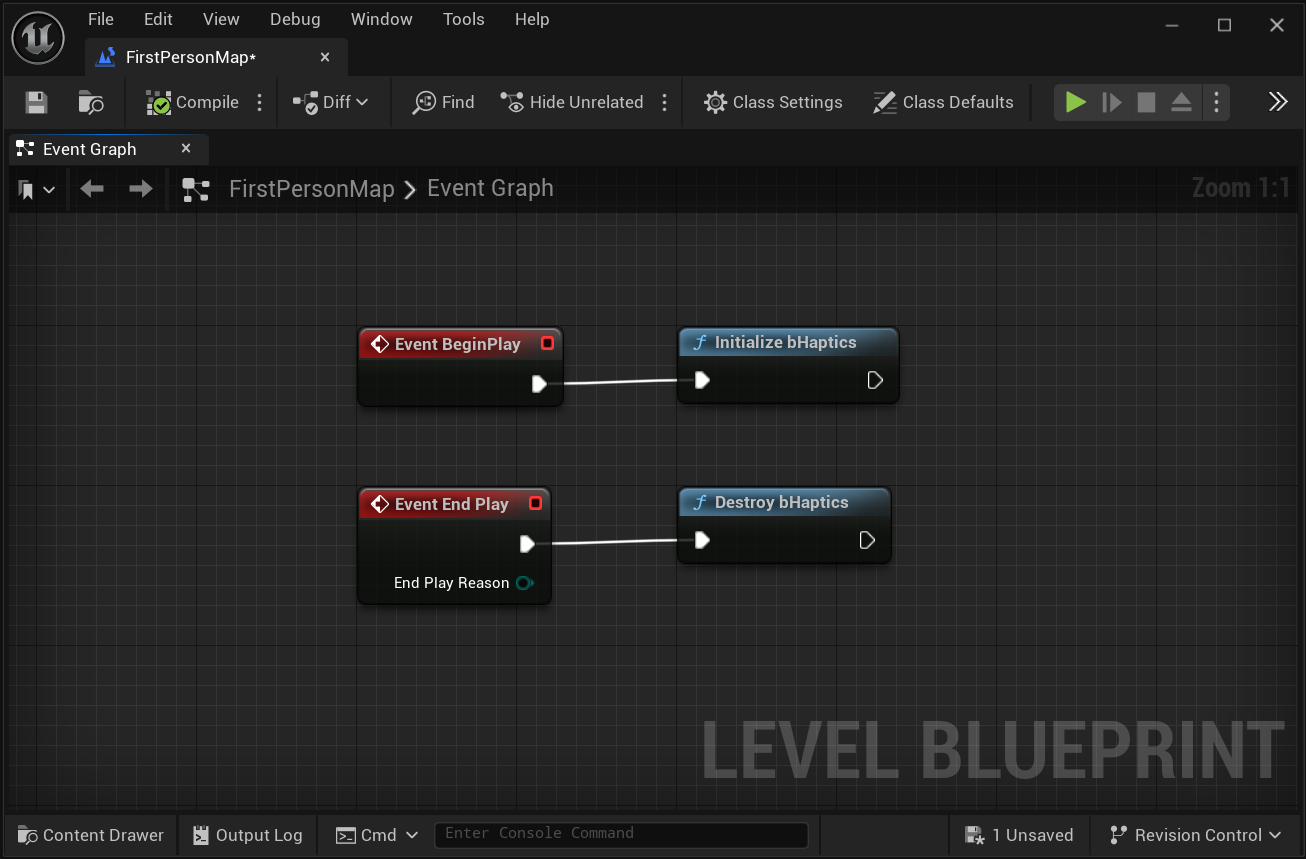
- Initialize: Connect "Initialize bHaptics" after "Event BeginPlay".
- Destroy: Connect "Destroy bHaptics" after "Event End Play".
(Optional) Prepare for C++
If you're using C++ in your Unreal project, there are some additional required processes.
- Move to
Source/[YourGameName]/[YourGameName].Build.csand add dependency.Source/[YourGameName]/[YourGameName].Build.cs// Add DependencyPrivateDependencyModuleNames.Add("BhapticsPlugin");// Or Using AddRangePrivateDependencyModuleNames.AddRange(new string[] { "BhapticsPlugin" });noteAfter you modify the
Build.csfile, you must regenerate the project files, and rebuild the engine.- Regenerate the project files: Go to your Unreal project in the file explorer, right-click the
[YourUEProjectName].uprojectfile, and select "Generate Visual Studio Project Files". - Rebuild the engine: Open
[YourUEProjectName].sln, right-click the project name in the Solution Explorer, and select "Rebuild".
- Regenerate the project files: Go to your Unreal project in the file explorer, right-click the
- Include
"BhapticsSDK2.h"header in your C++ script which uses the haptic features.#include "CppGameModeBase.h"#include "BhapticsSDK2.h"void CppGameModeBase::BeginPlay(){Super::BeginPlay();UBhapticsSDK2::Initialize();}
macOS Network Entitlement
On macOS 15 (Sequoia) and later, a packaged app runs inside the App Sandbox. The sandbox blocks all network access(including connections to localhost) unless the app declares the network client entitlement. Because the SDK talks to bHaptics Player over a local connection, a packaged macOS build without this entitlement cannot connect to the Player (you may see it fail with a sandbox deny network error).
When you package your app for macOS, add com.apple.security.network.client entitlement. This is configured by the app developer and is not part of the SDK.
Further Reading
You're now ready to use the bHaptics haptic feature! Visit our Unreal Reference to play haptics in your game.